Created: 2021-07-04 11:18:30
Modified: Fri Sep 17 18:39:12 CST 2021
|
CPU/GPU/NPU support
What you need to install to support advanced computing depends on your hardware of device, and the requirements of machine learning library, like TensorFlow, Torch, MindSpore and so on.
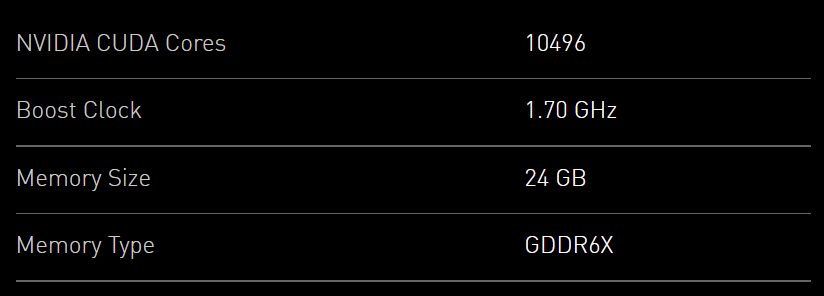
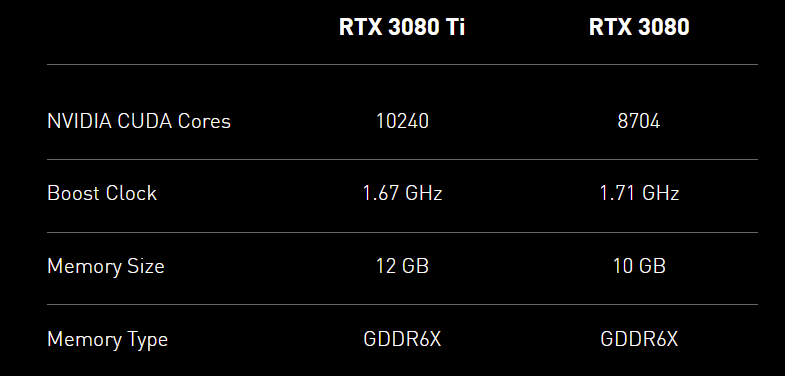
if use NVIDIA GPU supporting CUDA (how to choose), usually the following NVIDIA® dependencies need installed:
version check, refer to https://blog.csdn.net/weixin_41803874/article/details/91913063, https://docs.nvidia.com/deploy/cuda-compatibility, https://tensorflow.google.cn/install/source#gpu. ps. cuda 10.0 seems to not support RTX30, so that use cuda 11.
-
check GPU:
lspci | grep 'VGA'It usually has been installed since operation system was installed.
In Ubuntu, it is recommended to use GUI to install or change your GPU driver, refer to Ubuntu Linux Install Nvidia Driver (Latest Proprietary Driver) - nixCraft (cyberciti.biz), OR use terminal:
# refer to https://cyfeng.science/2020/05/02/ubuntu-install-nvidia-driver-cuda-cudnn-suits/
ubuntu-drivers devices
sudo ubuntu-drivers autoinstall
# or sudo apt install nvidia-driver-440
# reboot
In windows, download the installation packages from NVIDIA official website and install it.
Now, if you use
conda, you can just install the runtime files ofcudaandcudnn, and skip the following two installation(the differences):# conda isntall `cuda` and `cudnn`, for example:
conda install cudatoolkit=10.0 -c https://mirrors.tuna.tsinghua.edu.cn/anaconda/pkgs/free/linux-64/
conda install cudnn=7.4 -c https://mirrors.tuna.tsinghua.edu.cn/anaconda/pkgs/main/linux-64/
-
Read related software documents, like GPU support | TensorFlow (google.cn), to choose correct CUDA version.
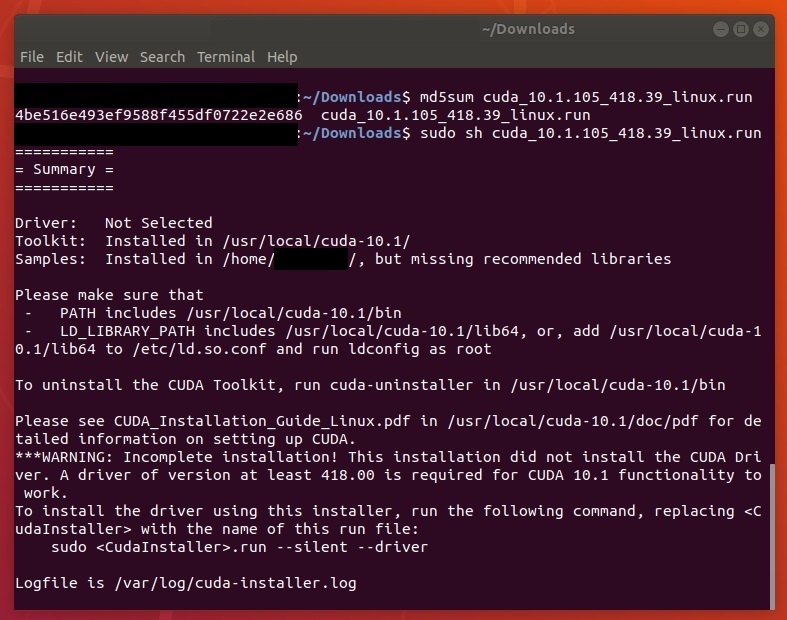
Note: you need to choose
runfilepackages to install old version if you use Ubuntu.For Ubuntu 18.04 LTS, refer to the CUDA installation section in Ubuntu 18.04安装CUDA和cuDNN - 知乎 (zhihu.com) and install CUDA without selecting driver component. Note that you would better to record those information.
For Windows 10, you can refer to the CUDA installation section in win10安装CUDA和cuDNN的正确姿势 - 知乎 (zhihu.com). Uninstall and install CUDA refer to windows下CUDA的卸载以及安装_m0_37605642的博客-CSDN博客_cuda卸载, note that you can keep the high version of components of Display Driver, PhysX, NVIDIA GeForce Experience.
Notice: do not care about the GPU drivers, you can verify CUDA firstly according to the following instructions, and if there is mismatching information printed, change your drivers later. To verify your installation:
- check
nvcc, execute the following command line in shell:
nvcc -VIf there is no information printed, check your environment variables:
in Ubuntu, execute the following command line in shell, refer to ubuntu-设置系统环境变量 - 简书 (jianshu.com), Environment Setup :: CUDA Toolkit Documentation (nvidia.com), Ubuntu 18.04安装CUDA和cuDNN - 知乎 (zhihu.com):
echo '# CUDA' >> ~/.bashrc
echo 'export PATH=/usr/local/cuda/bin${PATH:+:${PATH}}' >> ~/.bashrc
echo 'export LD_LIBRARY_PATH=/usr/local/cuda/lib64\
${LD_LIBRARY_PATH:+:${LD_LIBRARY_PATH}}' >> ~/.bashrc
source ~/.bashrc
If environment variables has been set done, CUDA Runtime version will be printed according to CUDA Runtime API, which should be not higher than CUDA Driver version, which you can look up by executing the following command line:
nvidia-smi

pip install gpustat
gpustat -i 1 -cup --force-color
# watch --color -n 1 gpustat --force-color -cup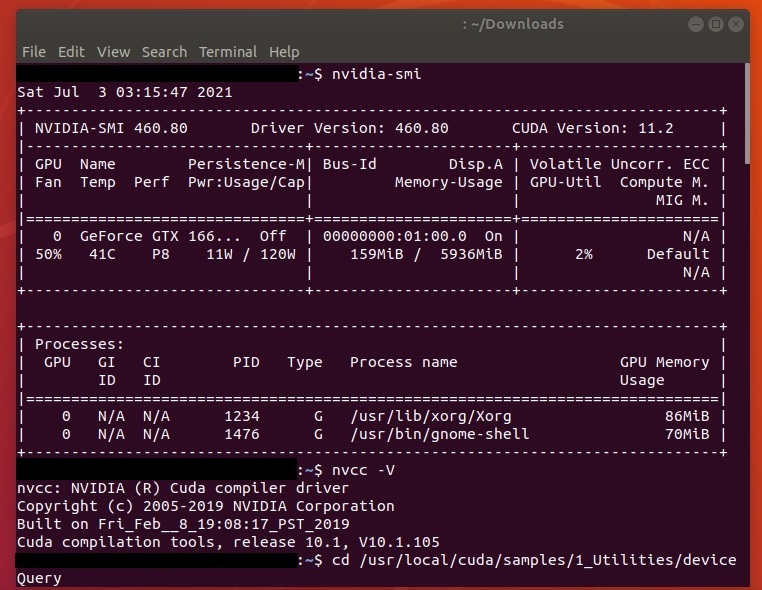
if you do not get CUDA Driver version printed or your CUDA Driver version is lower than Runtime version, install or update your NVIDIA® GPU drivers according to next step.
- running compiled examples,
in windows, refer to windows 验证CUDA和CUDNN是否安装成功 - 知乎 (zhihu.com), Installation Guide Windows :: CUDA Toolkit Documentation (nvidia.com):
cd C:\Program Files\NVIDIA GPU Computing Toolkit\CUDA\v11.1
cd extras\demo_suite
deviceQuery.exe
bandwidthTest.exe
*v11.1 is the version of your CUDA.
in Ubuntu,
cd /usr/local/cuda/samples/1_Utilities/deviceQuery
sudo make
./deviceQuery
cd ..
cd bandwidthTest
sudo make
./bandwidthTest
If
Result = PASSis printed, your CUDA has been installed well, and you can skip the step of NVIDIA® GPU drivers, while if there is something wrong with mismatching between driver version and CUDA version, carry out the next step. - check
cuDNN. Refer to https://docs.nvidia.com/deeplearning/cudnn/install-guide/index.html.
Check your installation version, in windows,
cd C:\Program Files\NVIDIA GPU Computing Toolkit\CUDA\v11.1
cd include
cudnn_version.h
in Ubuntu,
cat /usr/local/cuda/include/cudnn.h | grep CUDNN_MAJOR -A 2
if use Intel iGPU/FPGA(deprecated)/VPUs/HDDL/MYRIAD/HETERO with OpenVINO,
if use Huawei Ascend which supports CANN,
if use AMD/ATI GPU which supports AMD-MLP, which is based on OpenCL supporting parallel computing across various devices, give it up.
if use DirectML on Windows hardware include AMD, Intel and NVIDIA GPUs,
refer to GPU accelerated ML training inside the Windows Subsystem for Linux - Windows Developer Blog, 直接机器学习 (DirectML) - Win32 apps | Microsoft Docs, GitHub - microsoft/DirectML, GPU with DirectML | Microsoft Docs.
Refer to https://docs.microsoft.com/en-us/windows/win32/direct3d12/gpu-faq, to know how to use multiple GPUs by DirectML.
if use CUDA supports a laptop with an iGPU and a dGPU running Ubuntu, refer to Installation Guide Linux :: CUDA Toolkit Documentation (nvidia.com).
if use Google Cloud or kaggle,
Python
install python
if use windows, go into Download Python | Python.org, download and install what you need; To choose which windows version, refer to python官网的几个windows版本的区别 - 简书 (jianshu.com).
*suggestion: add python to PATH of environment variables;install pip.
if use Ubuntu,
# use source file
wget https://www.python.org/ftp/python/3.7.5/Python-3.7.5.tgz
tar -zxvf Python-3.7.5.tgz
cd Python-3.7.5
#  --enable-loadable-sqlite-extensions if use libsqlite3-dev
./configure --prefix=/usr/local/python3.7.5 --enable-shared
make
sudo make install
# or use apt
apt-get install python3.7
#set environmental variables
vim .bashrc
export LD_LIBRARY_PATH=/usr/local/python3.7.5/lib:$LD_LIBRARY_PATH
export PATH=/usr/local/python3.7.5/bin:$PATH
source .bashrc
# test
python3 --version
pip3 --version
install ML-lib
machine learning libraries(frameworks) include TensorFlow, PyTorch, MindSpore and so on
TensorFlow 2
if use TensorFlow 2, refer to Install TensorFlow 2 (google.cn):
# Current stable release for CPU and GPU
pip3 install tensorflow
# Successfully installed absl-py-0.13.0 astunparse-1.6.3 cached-property-1.5.2 cachetools-4.2.2 certifi-2021.5.30 chardet-4.0.0 flatbuffers-1.12 gast-0.4.0 google-auth-1.32.0 google-auth-oauthlib-0.4.4 google-pasta-0.2.0 grpcio-1.34.1 h5py-3.1.0 idna-2.10 importlib-metadata-4.6.0 keras-nightly-2.5.0.dev2021032900 keras-preprocessing-1.1.2 markdown-3.3.4 numpy-1.19.5 oauthlib-3.1.1 opt-einsum-3.3.0 protobuf-3.17.3 pyasn1-0.4.8 pyasn1-modules-0.2.8 requests-2.25.1 requests-oauthlib-1.3.0 rsa-4.7.2 six-1.15.0 tensorboard-2.5.0 tensorboard-data-server-0.6.1 tensorboard-plugin-wit-1.8.0 tensorflow-2.5.0 tensorflow-estimator-2.5.0 termcolor-1.1.0 typing-extensions-3.7.4.3 urllib3-1.26.6 werkzeug-2.0.1 wheel-0.36.2 wrapt-1.12.1 zipp-3.4.1
To verify your installation:
python -c "import tensorflow.compat.v1 as tf; tf.test.gpu_device_name(); tf.test.is_gpu_available()"
# ...Successfully opened dynamic library xxx
For more verification, refer to Tensorflow 2环境下,程序快速测试 GPU是否安装成功_sTeven LI-CSDN博客_tensorflow2测试gpu.
or install CPU version:
pip3 install tensorflow-cpu
# Successfully installed absl-py-0.13.0 astunparse-1.6.3 cached-property-1.5.2 cachetools-4.2.2 charset-normalizer-2.0.4 clang-5.0 flatbuffers-1.12 gast-0.4.0 google-auth-1.35.0 google-auth-oauthlib-0.4.6 google-pasta-0.2.0 grpcio-1.40.0 h5py-3.1.0 idna-3.2 importlib-metadata-4.8.1 keras-2.6.0 keras-preprocessing-1.1.2 markdown-3.3.4 numpy-1.19.5 oauthlib-3.1.1 opt-einsum-3.3.0 protobuf-3.17.3 pyasn1-0.4.8 pyasn1-modules-0.2.8 requests-2.26.0 requests-oauthlib-1.3.0 rsa-4.7.2 six-1.15.0 tensorboard-2.6.0 tensorboard-data-server-0.6.1 tensorboard-plugin-wit-1.8.0 tensorflow-cpu-2.6.0 tensorflow-estimator-2.6.0 termcolor-1.1.0 typing-extensions-3.7.4.3 urllib3-1.26.6 werkzeug-2.0.1 wrapt-1.12.1 zipp-3.5.0
TensorFlow 1.3
If you use Anaconda or the smaller Miniconda, following the steps in https://docs.anaconda.com/anaconda/user-guide/tasks/tensorflow/:
|
Note that MSVC 2015 update 3 is needed as Compiler for TensorFlow 1.3, refer to https://www.tensorflow.org/install/source_windows#cpu, so you need to install the Visual Studio 2015, 2017 and 2019, refer to https://www.tensorflow.org/install/pip#system-requirements.
|
|
PyTorch
if use Torch, refer to PyTorch:
pip3 install torch==1.9.0+cu111 torchvision==0.10.0+cu111 torchaudio===0.9.0 -f https://download.pytorch.org/whl/torch_stable.html
# Successfully installed numpy-1.21.0 pillow-8.2.0 torch-1.9.0+cu111 torchaudio-0.9.0 torchvision-0.10.0+cu111 typing-extensions-3.10.0.0
To verify your installation:
python -c "import torch; \
print(torch.__version__); \
print(torch.version.cuda); \
print(torch.backends.cudnn.version()); \
print(torch.cuda.is_available()); \
print(torch.cuda.device_count()); \
print(torch.cuda.current_device()); \
print(torch.cuda.device(0)); \
print(torch.cuda.get_device_name(0))"
# 1.9.0+cu111
# 11.1 # may not consist with above
# 8005
# True
# 1
# 0
# <torch.cuda.device at 0x7efce0b03be0>
# 'GeForce GTX 950M'
# refer to: https://stackoverflow.com/questions/48152674/how-to-check-if-pytorch-is-using-the-gpu
For more verification, refer to pytorch:测试GPU是否可用_明月几时有,把酒问青天-CSDN博客, PyTorch_GPU加速测试_liming_2464的博客-CSDN博客.
pytorch_lightning
https://blog.csdn.net/weixin_46062098/article/details/109713240
https://zhuanlan.zhihu.com/p/157742258
https://zhuanlan.zhihu.com/p/235392539
https://zhuanlan.zhihu.com/p/319810661
MindSpore
if use MindSpore, refer to MindSpore安装指南,手把手安装和体验:
Before installing MindSpore, you should install GCC, refer to 如何在Ubuntu 18.04上安装GCC编译器 (linuxidc.com), Ubuntu下gcc安装及使用_lucifa_li的博客-CSDN博客_ubuntu下载gcc, and m4,
sudo apt-get install m4and gmp, refer to 安装gmp-6.1.2库 - 云+社区 - 腾讯云 (tencent.com),
xz -d gmp-6.1.2.tar.xz
tar -xvf gmp-6.1.2.tar
cd gmp-6.1.2
./configure --enable-cxx --prefix=/usr/local/gmp6 --build=x86_64-linux
make
make check
sudo make install
# vim ~/.bashrc
export LD_LIBRARY_PATH=/usr/local/gmp6/lib:$LD_LIBRARY_PATH
# :wq
# test
cd ..
gcc test_gmpxx.cpp -lgmp -lm -o test
./test
and cmake, refer to update cmake:
# slowly download
wget https://cmake.org/files/v3.21/cmake-3.21.2.tar.gz --no-check-certificate
tar -zxvf cmake-3.21.2.tar.gz
cd cmake-3.21.2
./bootstrap
make
sudo make install
hash -r
cmake --version
then install CPU version:
|
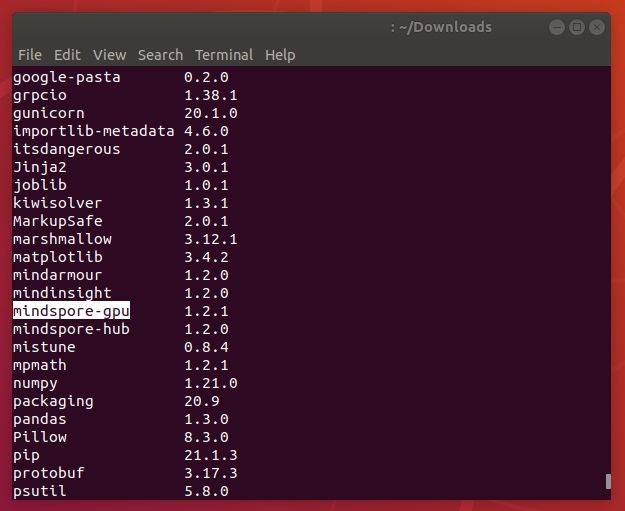
or install CUDA GPU version:
|
Otherwise, install Ascend 310 Linux version:
|
install Ascend Data Center Solution 21.0.2, inlcude driver, firmware of nnrt(neural network runtime) and toolkit(the last two are included in the insider CANN version ?), then
|
Optional:
install MindInsight:
|
install MindArmour:
|
install MindSpore Hub:
Download .whl file from MindSpore Hub下载页面, then
|
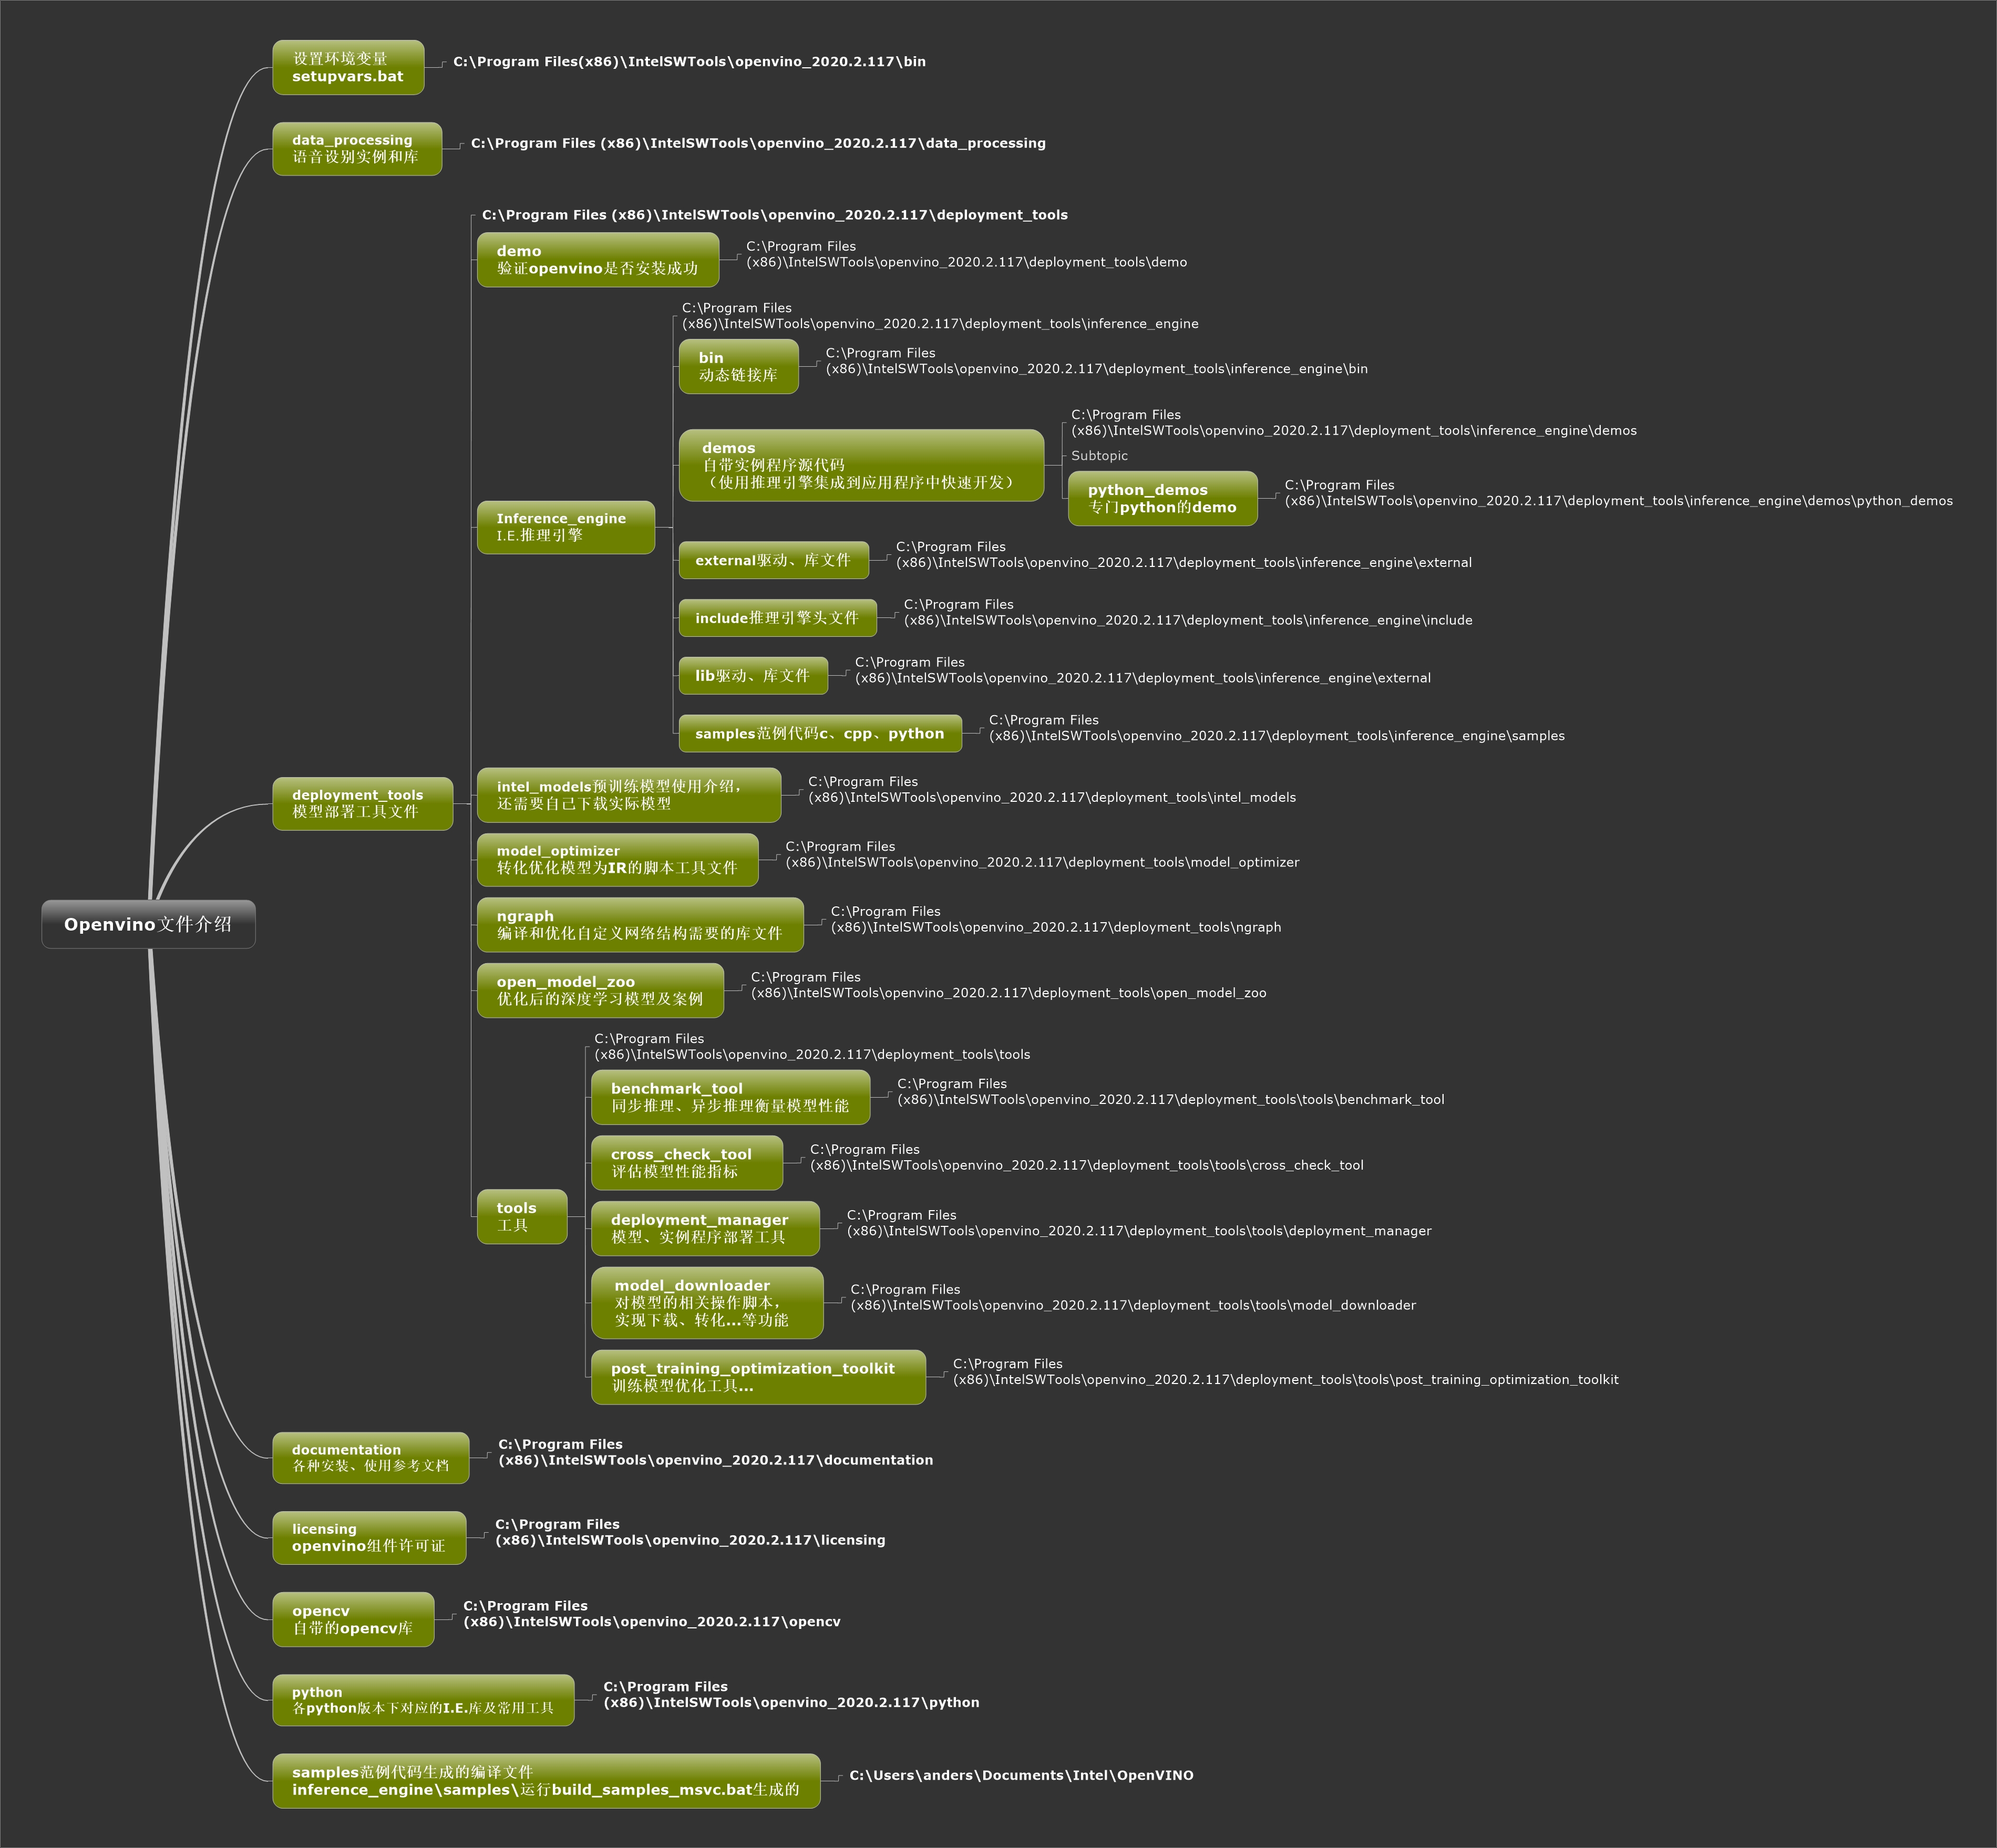
OpenVINO
if use OpenVINO, refer to Intel® Distribution of OpenVINO™ Toolkit. There are several requirements, like cmake if you use Windows 10 OS. You need to set the related environment variables:
conda create -n openvino python=3.7

conda activate openvino
"E:\Program Files (x86)\Intel\openvino_2021\bin\setupvars.bat"
# Python 3.7.11
# [setupvars.bat] OpenVINO environment initialized
Then you need to configure the Model Optimizer:
cd /d E:\Program Files (x86)\Intel\openvino_2021\deployment_tools\model_optimizer\install_prerequisites
# the Internet access is required for the next step
install_prerequisites.bat
# WARNING: The script normalizer.exe is installed in '~\AppData\Roaming\Python\Python37\Scripts' which is not on PATH.
# Consider adding this directory to PATH or, if you prefer to suppress this warning, use --no-warn-script-location.
# Successfully installed absl-py-0.13.0 astunparse-1.6.3 cachetools-4.2.2 charset-normalizer-2.0.4 defusedxml-0.7.1 flatbuffers-1.12 gast-0.3.3 google-auth-1.35.0 google-auth-oauthlib-0.4.6 google-pasta-0.2.0 graphviz-0.17 grpcio-1.32.0 h5py-2.10.0 idna-3.2 importlib-metadata-4.8.1 keras-preprocessing-1.1.2 markdown-3.3.4 mxnet-1.2.0 networkx-2.6.2 numpy-1.19.5 oauthlib-3.1.1 onnx-1.10.1 opt-einsum-3.3.0 protobuf-3.17.3 pyasn1-0.4.8 pyasn1-modules-0.2.8 requests-2.26.0 requests-oauthlib-1.3.0 rsa-4.7.2 six-1.15.0 tensorboard-2.6.0 tensorboard-data-server-0.6.1 tensorboard-plugin-wit-1.8.0 tensorflow-2.4.3 tensorflow-estimator-2.4.0 termcolor-1.1.0 typing-extensions-3.7.4.3 urllib3-1.26.6 werkzeug-2.0.1 wrapt-1.12.1 zipp-3.5.0
#- Inference Engine found in:    E:\Program Files (x86)\Intel\openvino_2021\python\python3.7\openvino
# Inference Engine version:       2021.4.0-3839-cd81789d294-releases/2021/4
# Model Optimizer version:        2021.4.0-3839-cd81789d294-releases/2021/4
# *****************************************************************************************
# Optional: To speed up model conversion process, install protobuf-*.egg located in the
# "model-optimizer\install_prerequisites" folder or building protobuf library from sources.
# For more information please refer to Model Optimizer FAQ, question #80.
# or install for one like tf2
install_prerequisites_tf2.bat
For advanced configuration for Model Optimizer, refer to Installing Model Optimizer Pre-Requisites and Model Optimizer Developer Guide.
If you want to compute on iGPU, you can install the Intel Graphics Driver ahead.
To use demo of OpenVINO, refer to Get Started Guide for Windows. There are some demos, for more refer to Inference Engine Samples and Demo Applications:
conda activate openvino
"E:\Program Files (x86)\Intel\openvino_2021\bin\setupvars.bat"
cd /d E:\Program Files (x86)\Intel\openvino_2021\deployment_tools\demo
.\demo_squeezenet_download_convert_run.bat
.\demo_security_barrier_camera.bat -d GPU
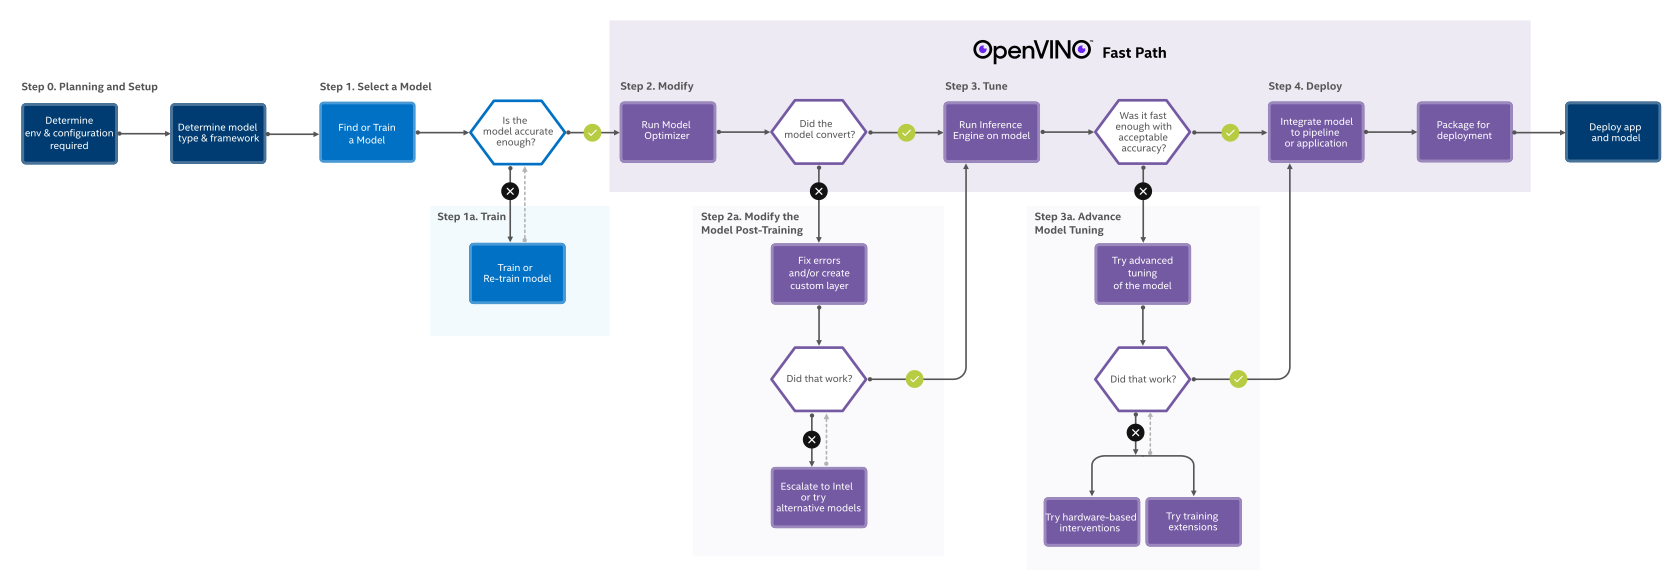
.\demo_benchmark_app.bat -d GPUTo use OpenVINO with its workflow, refer to OpenVINO™ Toolkit Overview and Learn the Workflow,
# python
from os import path
from openvino.inference_engine import IECore
ie = IECore()
model = '{path of model}'
net = ie.read_network(model, path.splitext(model)[0] + ".bin")
# assert len(net.input_info) == {}, "Demo supports {} input topologies"
# assert len(net.outputs) == {}, "Demo supports {} output topologies"
# next(iter(net.input_info))
# sorted(net.outputs)
net.outputs.keys()
net.outputs[{name}].shape
net.input_info[{name}].input_data.shape
There are more information with API and Data Structures.
To download public model and run Model Optimizer:
# Download public squeezenet1.1 model
python "E:\Program Files (x86)\Intel\openvino_2021\deployment_tools\open_model_zoo\tools\downloader\downloader.py" ^
--name "squeezenet1.1" ^
--output_dir "~\Documents\Intel\OpenVINO\openvino_models\models" ^
--cache_dir "~\Documents\Intel\OpenVINO\openvino_models\cache"
# Run Model Optimizer, Converting squeezenet1.1 to IR (FP16)
python "E:\Program Files (x86)\Intel\openvino_2021\deployment_tools\open_model_zoo\tools\downloader\converter.py" ^
--mo "E:\Program Files (x86)\Intel\openvino_2021\deployment_tools\model_optimizer\mo.py" ^
--name "squeezenet1.1" ^
-d "~\Documents\Intel\OpenVINO\openvino_models\models" ^
-o "~\Documents\Intel\OpenVINO\openvino_models\ir" ^
--precisions "FP16"
# or
python "E:\Program Files (x86)\Intel\openvino_2021\deployment_tools\model_optimizer\mo.py" ^
--framework=caffe ^
--data_type=FP16 ^
--output_dir=~\Documents\Intel\OpenVINO\openvino_models\ir\public\squeezenet1.1\FP16 ^
--model_name=squeezenet1.1 ^
--input_shape=[1,3,227,227] ^
--input=data ^
--mean_values=data[104.0,117.0,123.0] ^
--output=prob ^
--input_model=~\Documents\Intel\OpenVINO\openvino_models\models\public\squeezenet1.1/squeezenet1.1.caffemodel ^
--input_proto=~\Documents\Intel\OpenVINO\openvino_models\models\public\squeezenet1.1/squeezenet1.1.prototxt
To generate VS solution for Inference Engine samples using cmake:
Creating Visual Studio 16 2019 x64 files in ~\Documents\Intel\OpenVINO\inference_engine_samples_build...
-- Selecting Windows SDK version 10.0.19041.0 to target Windows 10.0.19043.
-- The C compiler identification is MSVC 19.29.30040.0
-- The CXX compiler identification is MSVC 19.29.30040.0
-- Detecting C compiler ABI info
-- Detecting C compiler ABI info - done
-- Check for working C compiler: E:/Program Files (x86)/Microsoft Visual Studio/2019/Community/VC/Tools/MSVC/14.29.30037/bin/Hostx64/x64/cl.exe - skipped
-- Detecting C compile features
-- Detecting C compile features - done
-- Detecting CXX compiler ABI info
-- Detecting CXX compiler ABI info - done
-- Check for working CXX compiler: E:/Program Files (x86)/Microsoft Visual Studio/2019/Community/VC/Tools/MSVC/14.29.30037/bin/Hostx64/x64/cl.exe - skipped
-- Detecting CXX compile features
-- Detecting CXX compile features - done
CMake Warning (dev) at thirdparty/cnpy/CMakeLists.txt:11 (if):
  Policy CMP0054 is not set: Only interpret if() arguments as variables or
  keywords when unquoted.  Run "cmake --help-policy CMP0054" for policy
  details.  Use the cmake_policy command to set the policy and suppress this
  warning.

  Quoted variables like "MSVC" will no longer be dereferenced when the policy
  is set to NEW.  Since the policy is not set the OLD behavior will be used.
This warning is for project developers.  Use -Wno-dev to suppress it.

-- Configuring done
-- Generating done
-- Build files have been written to: ~/Documents/Intel/OpenVINO/inference_engine_samples_build
To build Inference Engine samples using MS Visual Studio (MSBuild.exe):
"E:\Program Files (x86)\Microsoft Visual Studio\2019\Community\MSBuild\Current\Bin\MSBuild.exe" Samples.sln /p:Configuration=Release /t:cpp_samples\classification_sample_async /clp:ErrorsOnly /m
# 用于 .NET Framework 的 Microsoft (R) 生成引擎版本 16.10.2+857e5a733
# 版权所有(C) Microsoft Corporation。保留所有权利。
To run Inference Engine classification sample:
"~\Documents\Intel\OpenVINO\inference_engine_samples_build\intel64\Release\classification_sample_async.exe" ^
-i "E:\Program Files (x86)\Intel\openvino_2021\deployment_tools\demo\car.png" ^
-m "~\Documents\Intel\OpenVINO\openvino_models\ir\public\squeezenet1.1\FP16\squeezenet1.1.xml" ^
-d CPU
Optinal:
Use OpenVINO™ Deep Learning Workbench Overview.
Use Post-Training Optimization Tool.
Keras
troubleshooting:
|
NVIDIA GPU
set for computing only: https://blog.csdn.net/ZIV555/article/details/51755096; https://blog.csdn.net/Santo_Wong_94/article/details/50735418
AMD CPU
https://www.techradar.com/news/amd-ryzen-threadripper-vs-epyc-what-should-professionals-use
|