Created: 2021-06-07 00:29:11
Modified: 2021-09-10 10:31
use ascend
quickly see
|
|
ModelArts use
guide
local code in PC -> cloud code in obs -> my ModelArts algorithm /algorithm subscribed in AI Gallery -> Training Jobs ->
local dataset in PC/cloud dataset in AI Gallery -> cloud dataset in obs-> Training Jobs ->
-> output in Training Jobs -> output in obs
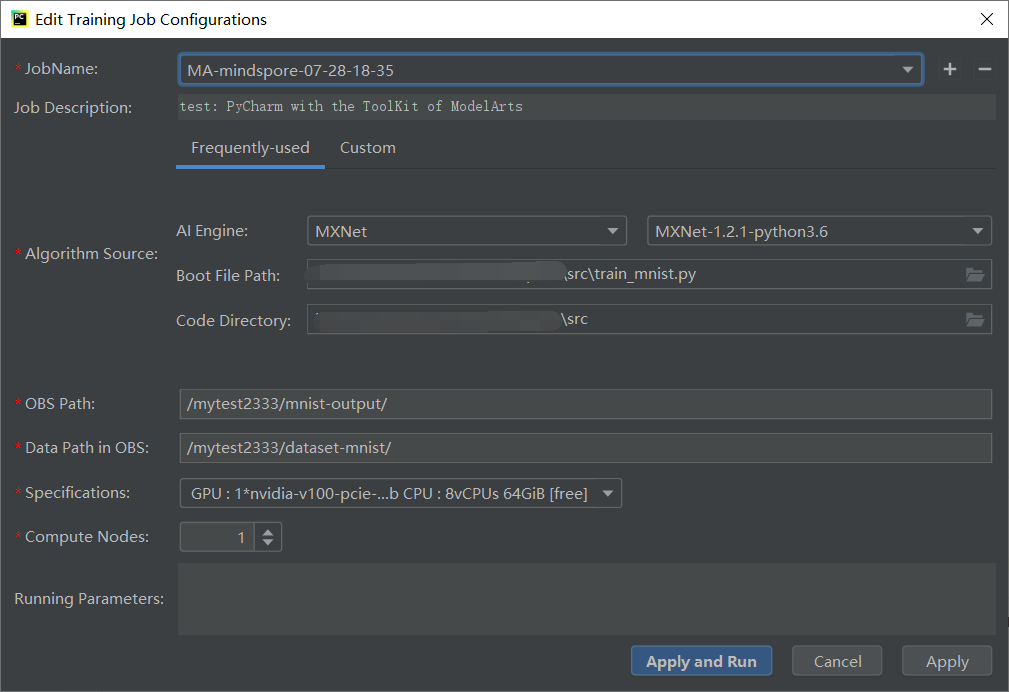
local code
according to PyCharm with the Plugin of ModelArts:
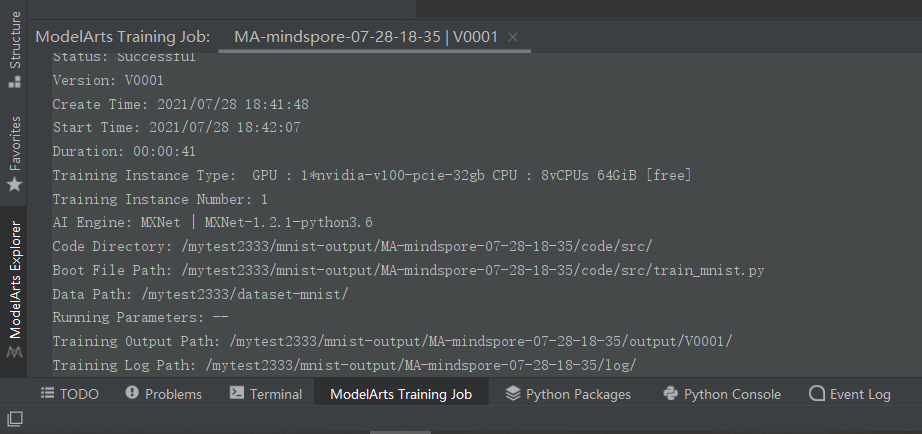
online training
local code in PC -> cloud code in obs -> my ModelArts algorithm -> Training Jobs -> output in Training Jobs -> output in obs
=> local code in PC -> the whole job & log in PyCharm
what you need to install are 3 items, refer to https://support.huaweicloud.com/bestpractice-modelarts/modelarts_10_0021.html:
- install the Plugin of ModelArts;
- create the Access Key and set it for your ModelArts(you can still use the Agency type Authorization if existing), refer to 获取访问密钥;
- set it for the Plugin of ModelArts, refer to 使用访问秘钥登录.
PyCharm
create and open one on Notebook -> remote configure on PyCharm -> restart and wait -> enter remote interpreter environment opening a script(connecting to remote host) -> upload files(synch and auto-upload files) -> wait a while(after index files) and then open requirements.txt and install dependency ->
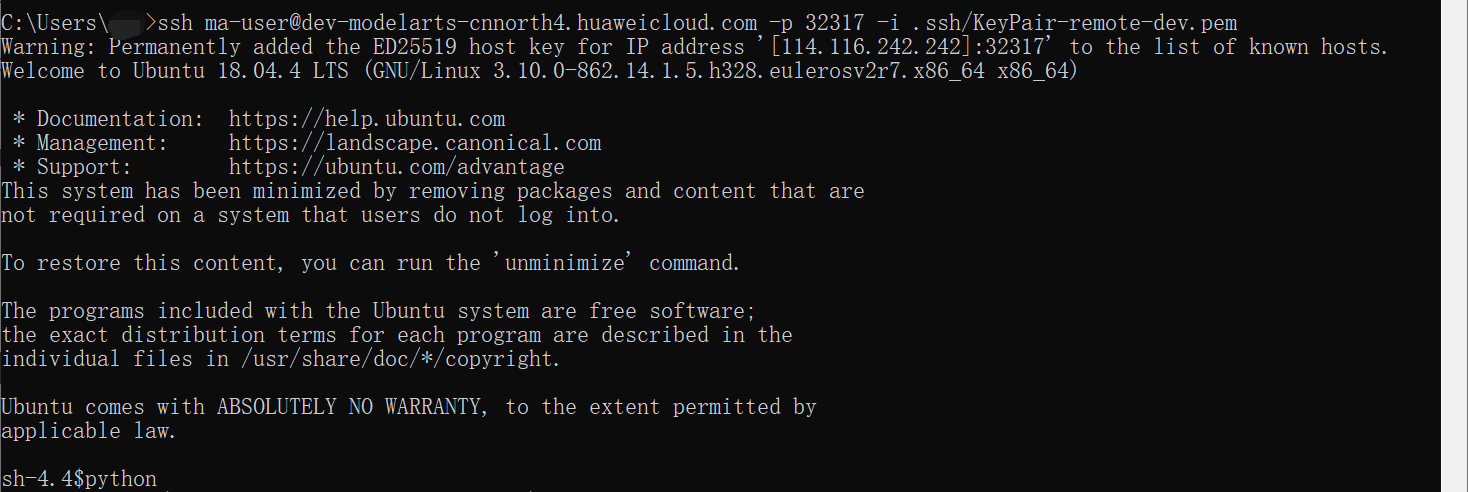
open terminal -> cd work/pangu_alpha -> ls -> python src/preprocess.py -> bash myrun.sh -> debug train.py(trial)

Update the whitelist of Notebook -> connect in PyCharm-> (tool-deployment) -> (change remote host) enter remote interpreter environment opening a script -> upload files(synch and auto-upload files) -> wait a while(after index files) and then open requirements.txt and install dependency ->
open terminal -> cd work/PanguGit-> ls -> python src/preprocess.py -> bash myrun.sh -> (configure first, like python interpreter)run train.py
Test, refer to https://bbs.huaweicloud.com/forum/thread-133615-1-1.html:
|
VS Code
refer to 配置本地IDE(VSCode手动连接).
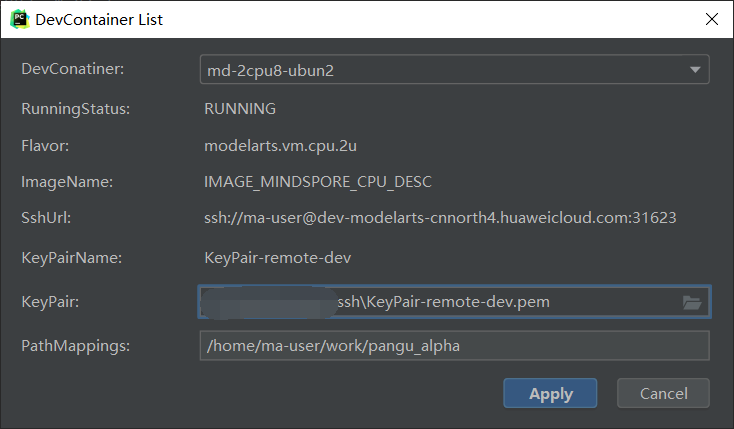
Firstly, make sure you use VSCode 1.57.1 with Extensions installed including Python and Remote-SSH, create a Notebook with SSH and prepare a pair of SSH key of Huawei Cloud.
|
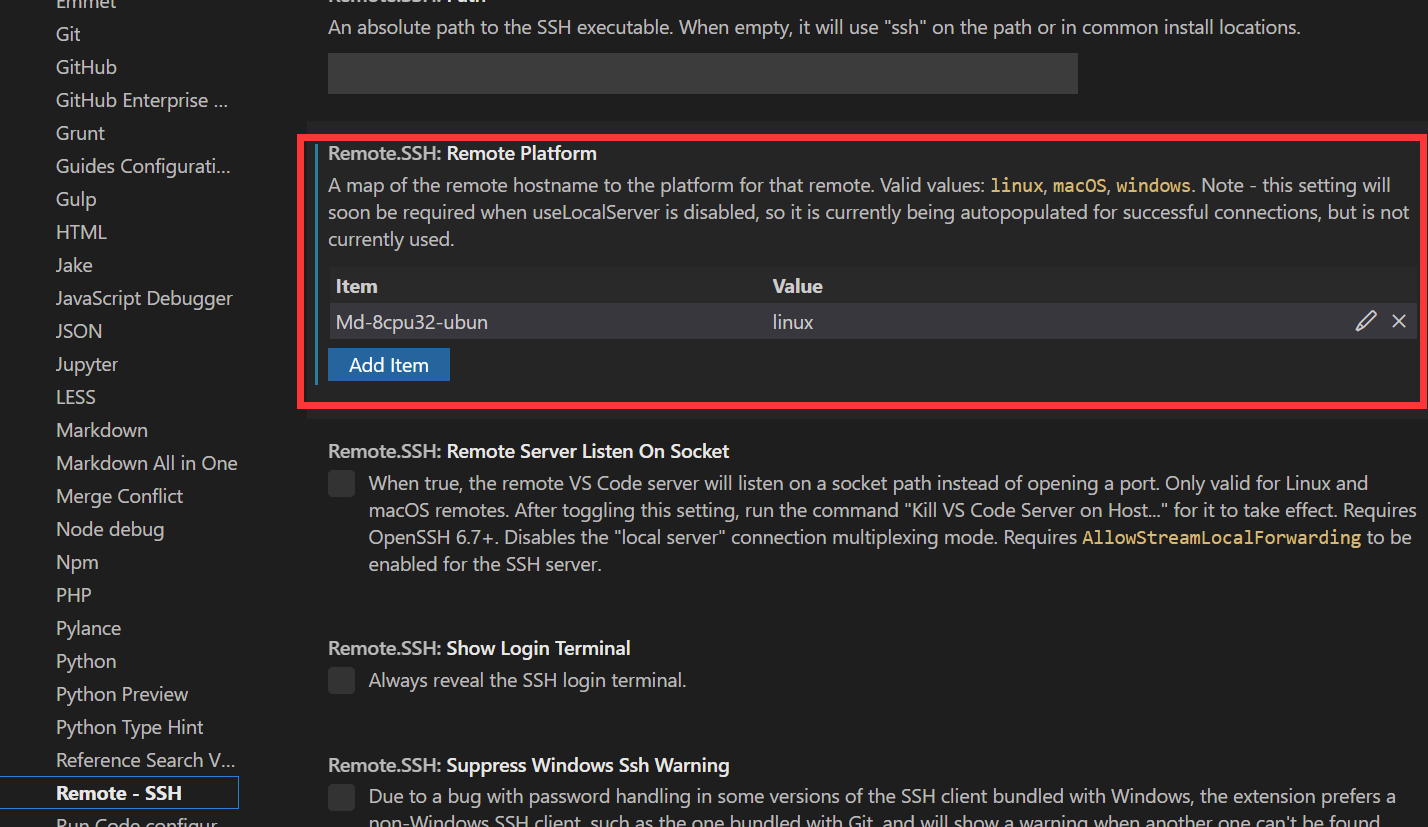
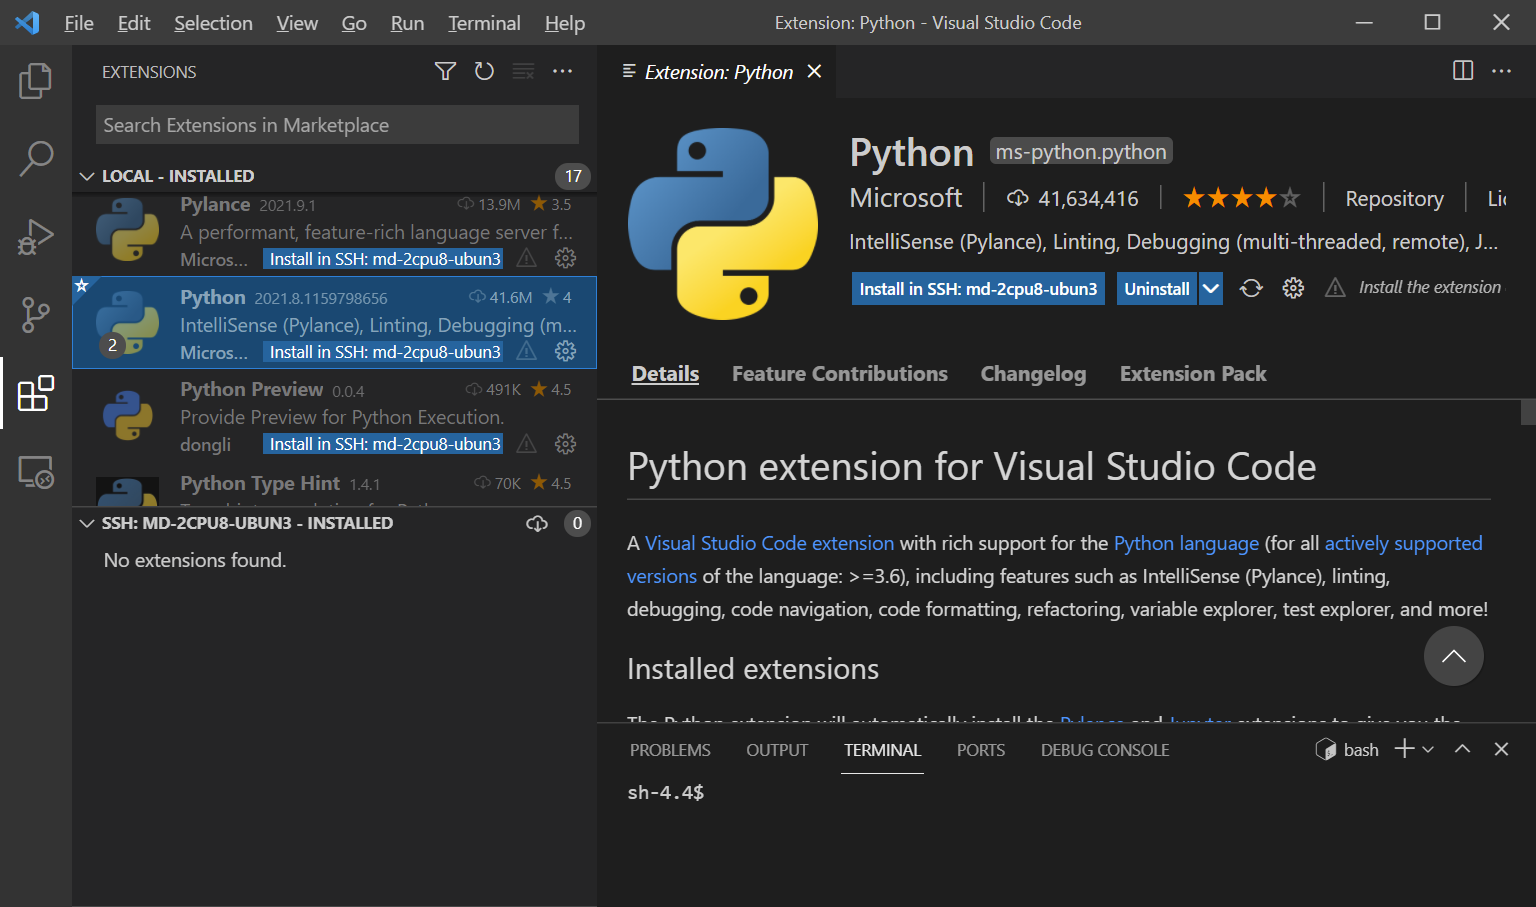
Ensure consistency between Nootbook and config file(Host, Port, path of key pair in particular) -> make sure Remote-SSH configured -> Update the whitelist of IP and open Notebook -> click the button of Connect to Host in New Window in vscode and wait a while(download VS Code server and copy it to host with scp) -> use VS Code server like a New one (install Extensions of VS code -> manage Folder in Cloud(drag and drop files from PC) -> Select Interpreter of Python (need to open a py file first in vscode) -> open New Terminal -> run and debug) -> close the Romote Connection and stop Notebook:

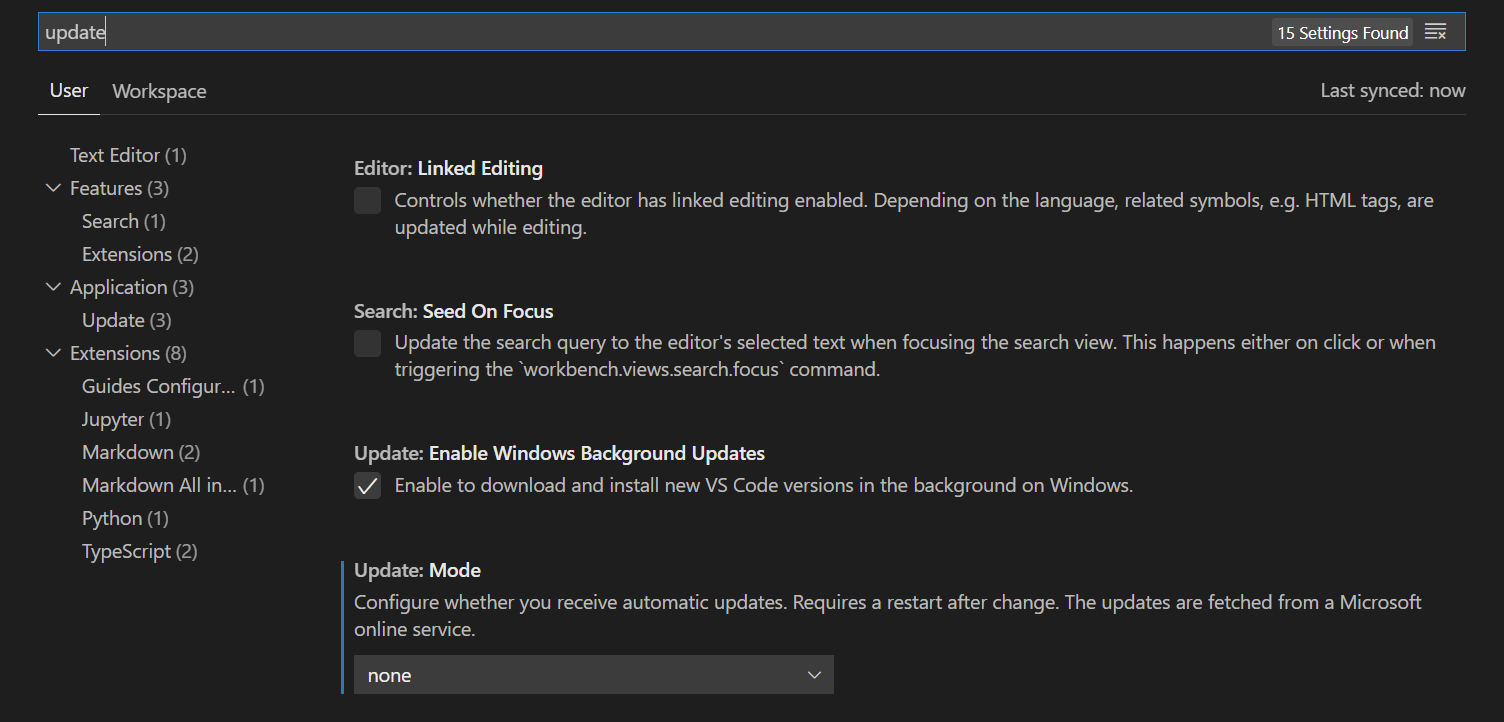
Note that you may want to disable the software update:
local dataset
local dataset in PC -> cloud dataset in obs->
use OBS Browser+ or obsutil to make it easily.
|
local development with SDK
use ModelArts SDK, refer to https://support.huaweicloud.com/sdkreference-modelarts/modelarts_04_0002.html
there is only python package version.
python package
|
Note: it seems not to support \ of path of Windows. and there is something wrong with dir operation?
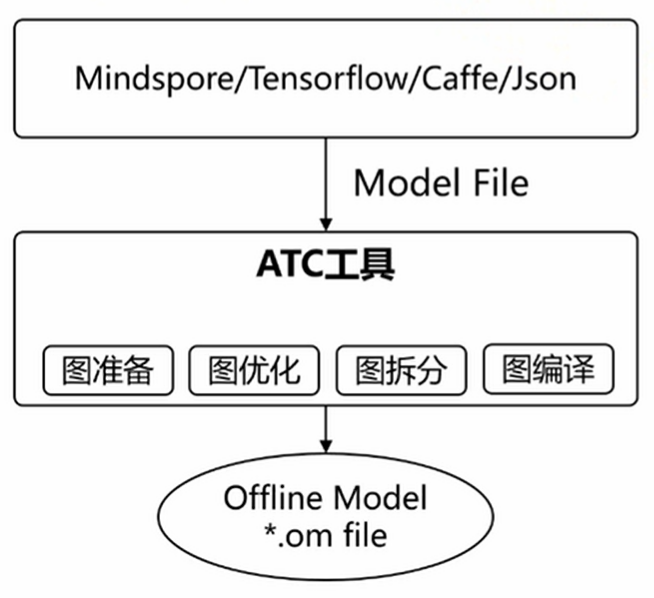
CANN
refer to CANN社区版安装指南(5.0.3.alpha002),
Prepare your devices including both hardware and software ahead. For example, you can [rent a server and run an Image in Huawei Cloud](#Ascend in Huawei Cloud).
(optional)Create and substitute with a User for installation or running, or use an image with user created in the step 1.
Install and check dependency of
aptandpipand firmware with root right, or use an image with dependency and firmware installed in the step 1. What’s more,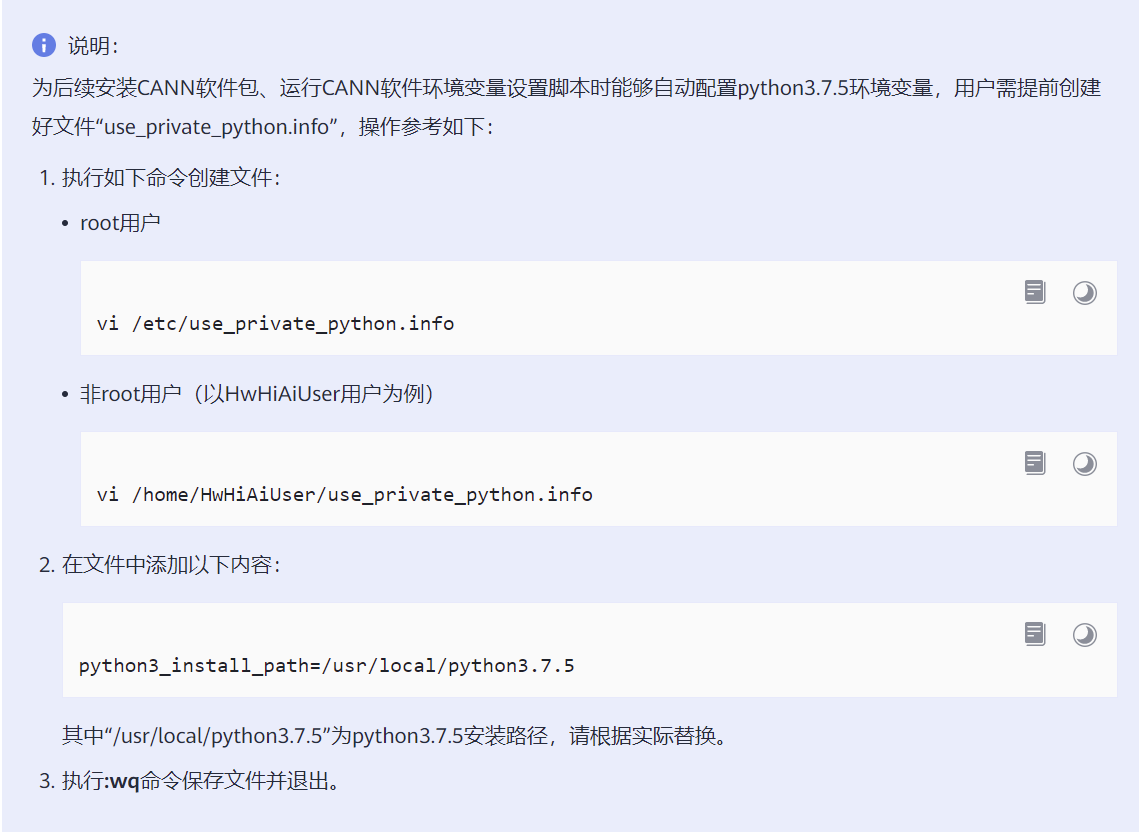
Besides, add environmental variables:
# in ~/.bashrc
export LD_LIBRARY_PATH=/usr/local/python3.7.5/lib:$LD_LIBRARY_PATH
export PATH=/usr/local/python3.7.5/bin:$PATH
For firmware of Driver,
# dowaload before
chmod +x A*
su
./A300-3010-npu-driver_21.0.2_linux-x86_64.run --full
# install in /usr/local/Ascend
reboot
Prepare the
.runpackage of CANN to the device and then install it. In insider version you can use command line to download and install it. The default installation path is/usr/local/Ascendor~/Ascend.validated the environmental variables of CANN
source ${install_path}/bin/setenv.bash
source ~/.bashrc
# farther
# 存在多个python版本时,需要指定为python3.7.5的安装路径,请根据实际情况修改
export PATH=/usr/local/python3.7.5/bin:$PATH
# for non-root user
export install_path=~/Ascend
# for root user
export install_path=/usr/local/Ascend
# ascend driver
export a_driver_path=/usr/local/Ascend/driver
# 加载Driver的so文件存在路径
export LD_LIBRARY_PATH=/usr/local/Ascend/driver/lib64/common/:/usr/local/Ascend/driver/lib64/driver:$LD_LIBRARY_PATH
# Runtime使用到的so文件存在路径
# 如环境中存在Driver,则配置如下。
export LD_LIBRARY_PATH=${install_path}/runtime/lib64:$LD_LIBRARY_PATH
# 如环境中不存在Driver,则配置如下。
export LD_LIBRARY_PATH=${install_path}/runtime/lib64:$LD_LIBRARY_PATH:${install_path}/runtime/lib64/stub
# Compiler使用的python路径
export PYTHONPATH=${install_path}/compiler/python/site-packages:$PYTHONPATH
# 如果用户环境存在多个python3版本,则指定使用python3.7.5版本,python3.7.5安装路径请根据实际情况进行替换;同时设置ATC工具可执行文件所在路径
export PATH=/usr/local/python3.7.5/bin:${install_path}/compiler/ccec_compiler/bin:${install_path}/compiler/bin:$PATH
# Compiler的库文件存在路径
export LD_LIBRARY_PATH=${install_path}/compiler/lib64:${install_path}/compiler/lib64/plugin/opskernel:${install_path}/compiler/lib64/plugin/nnengine:${install_path}/compiler/lib64/stub
# FwkPlugin使用的python路径
export PYTHONPATH=${install_path}/fwkplugin/python/site-packages:$PYTHONPATH
# Toolkit使用的python路径
export PYTHONPATH=${install_path}/toolkit/python/site-packages:$PYTHONPATH
export TOOLCHAIN_HOME=${install_path}/toolkit
# 算子库根目录
export ASCEND_OPP_PATH=${install_path}/opp
#AI CPU组件的安装路径
export ASCEND_AICPU_PATH=${install_path}/
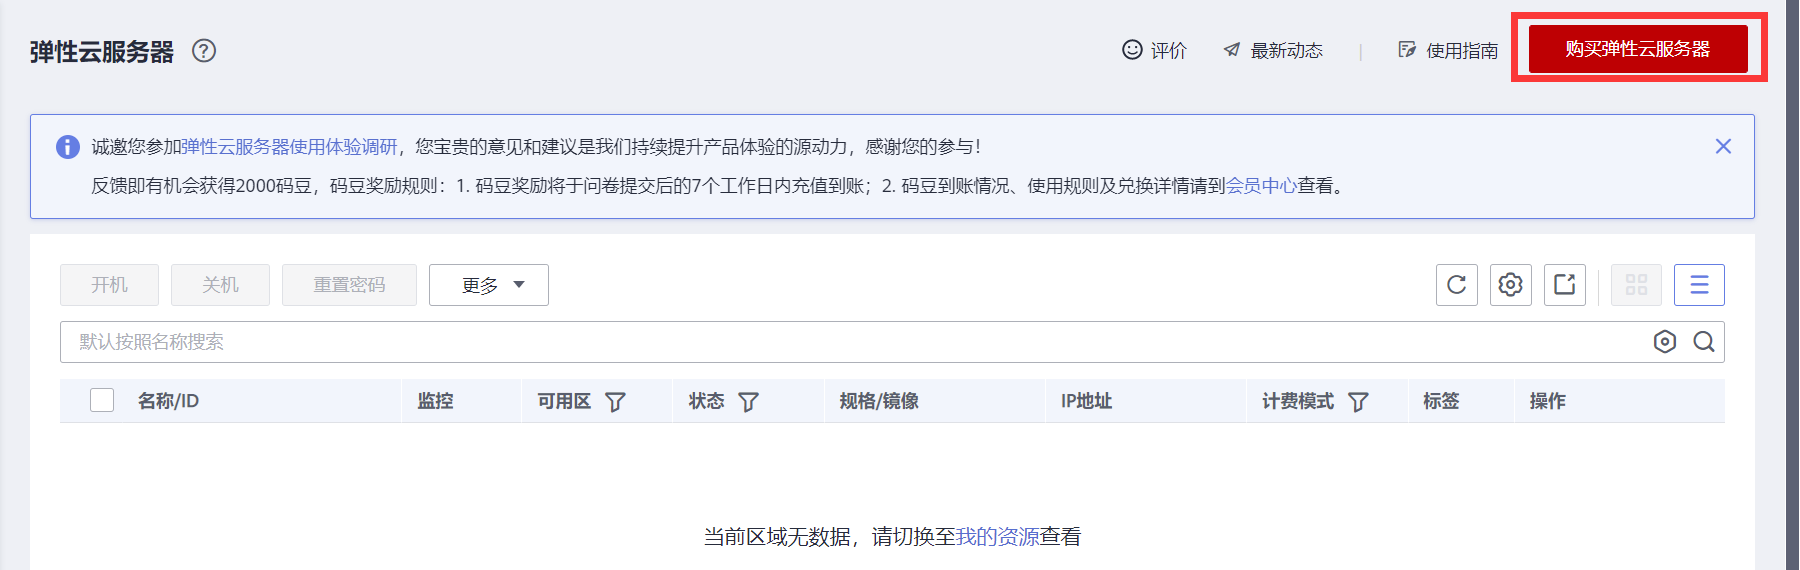
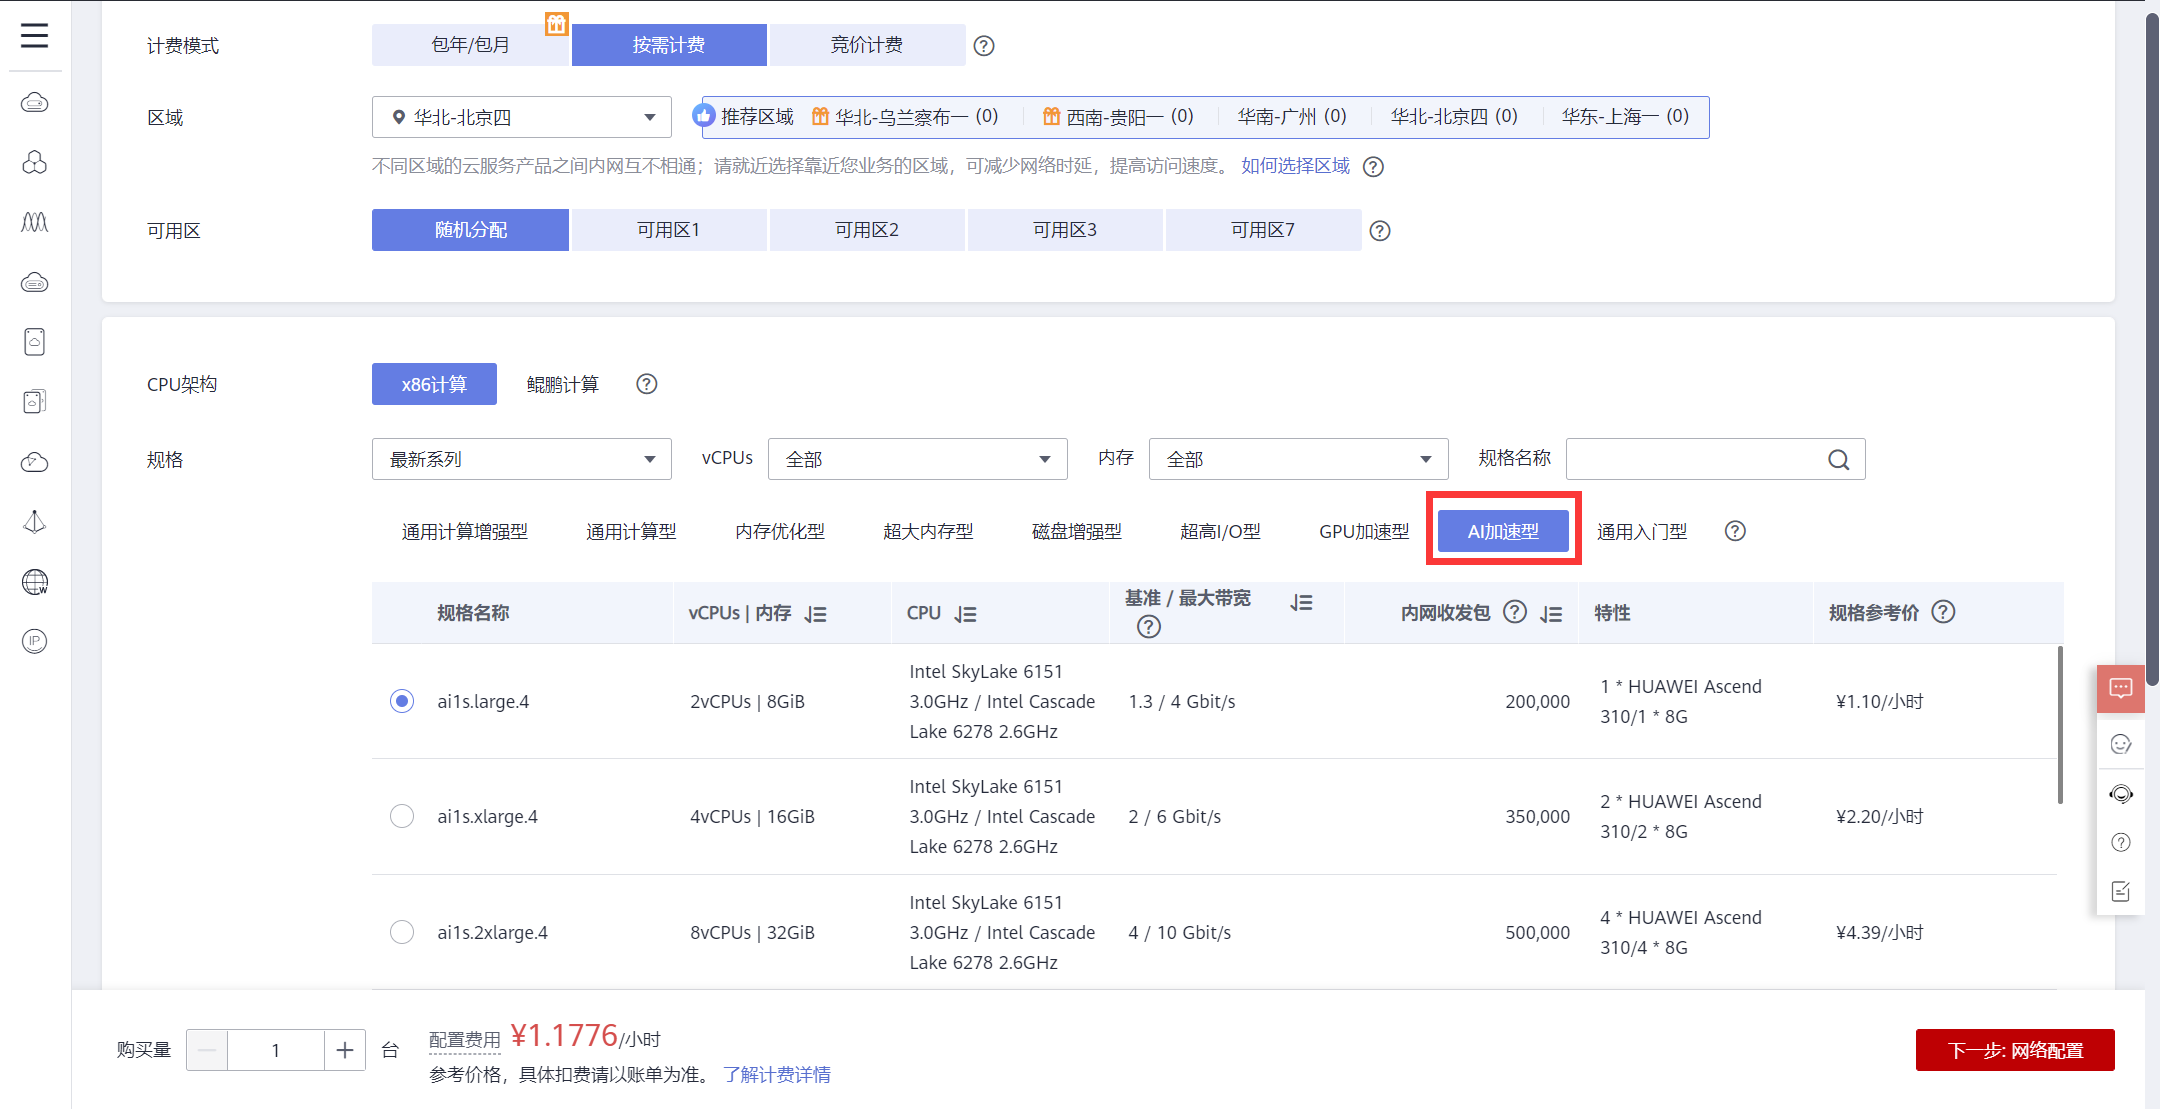
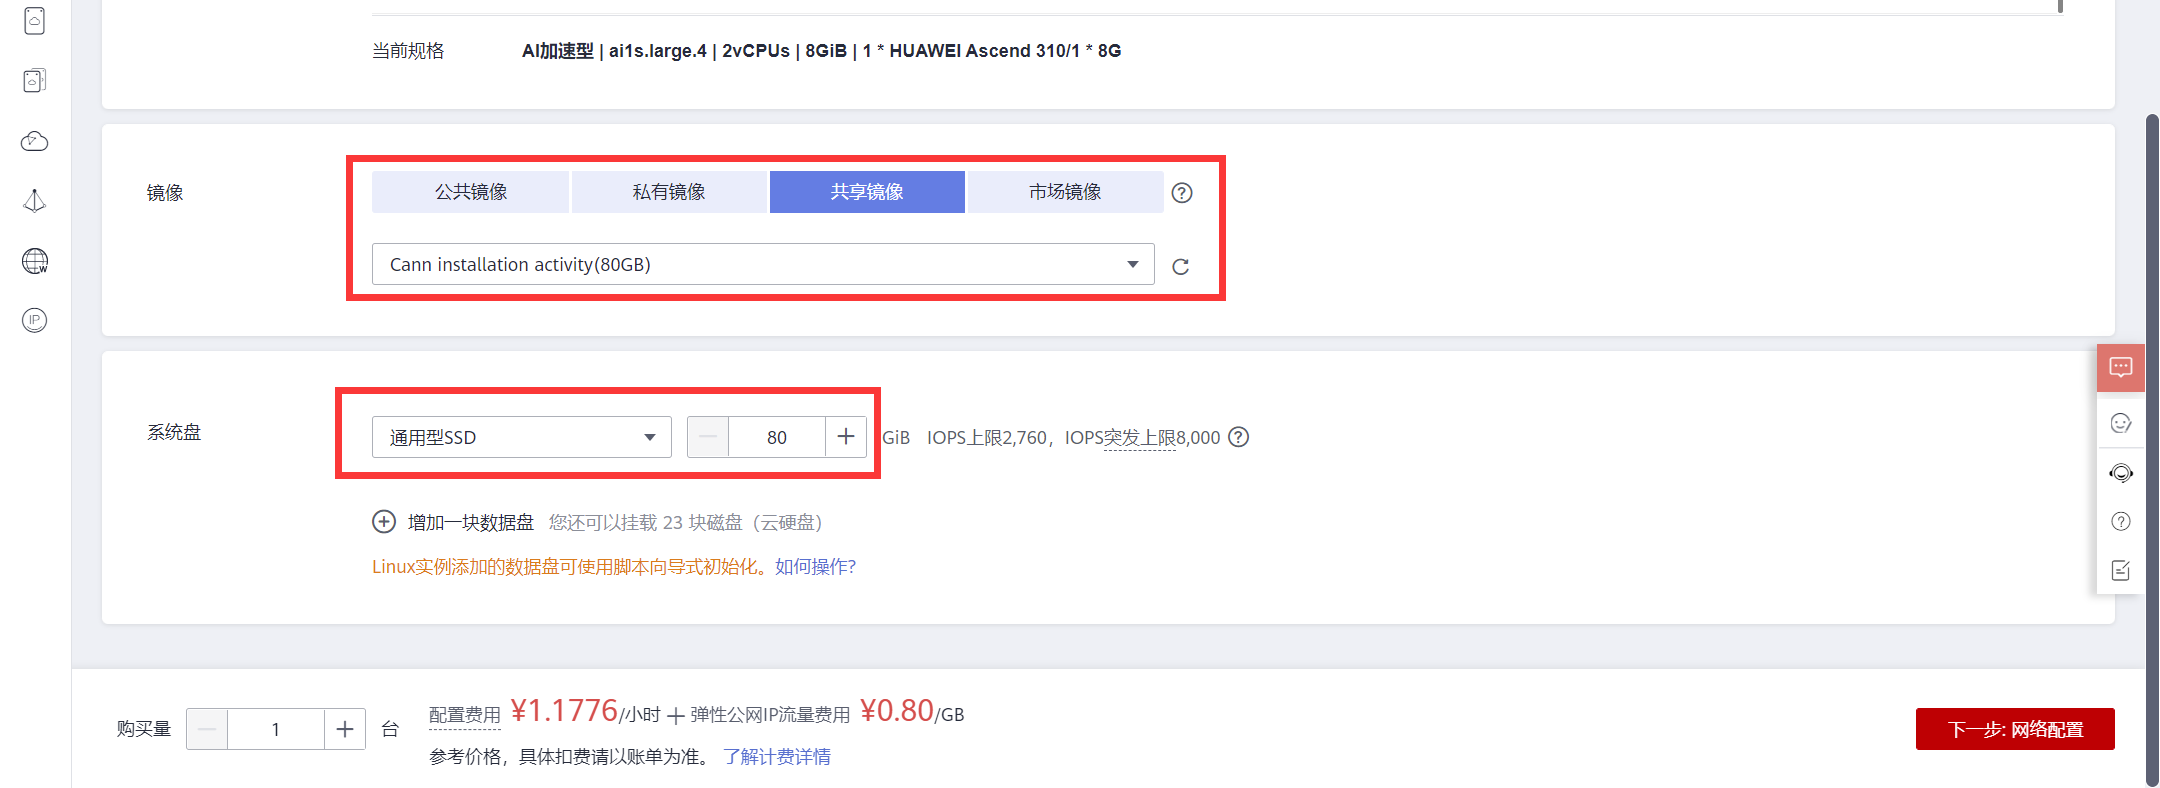
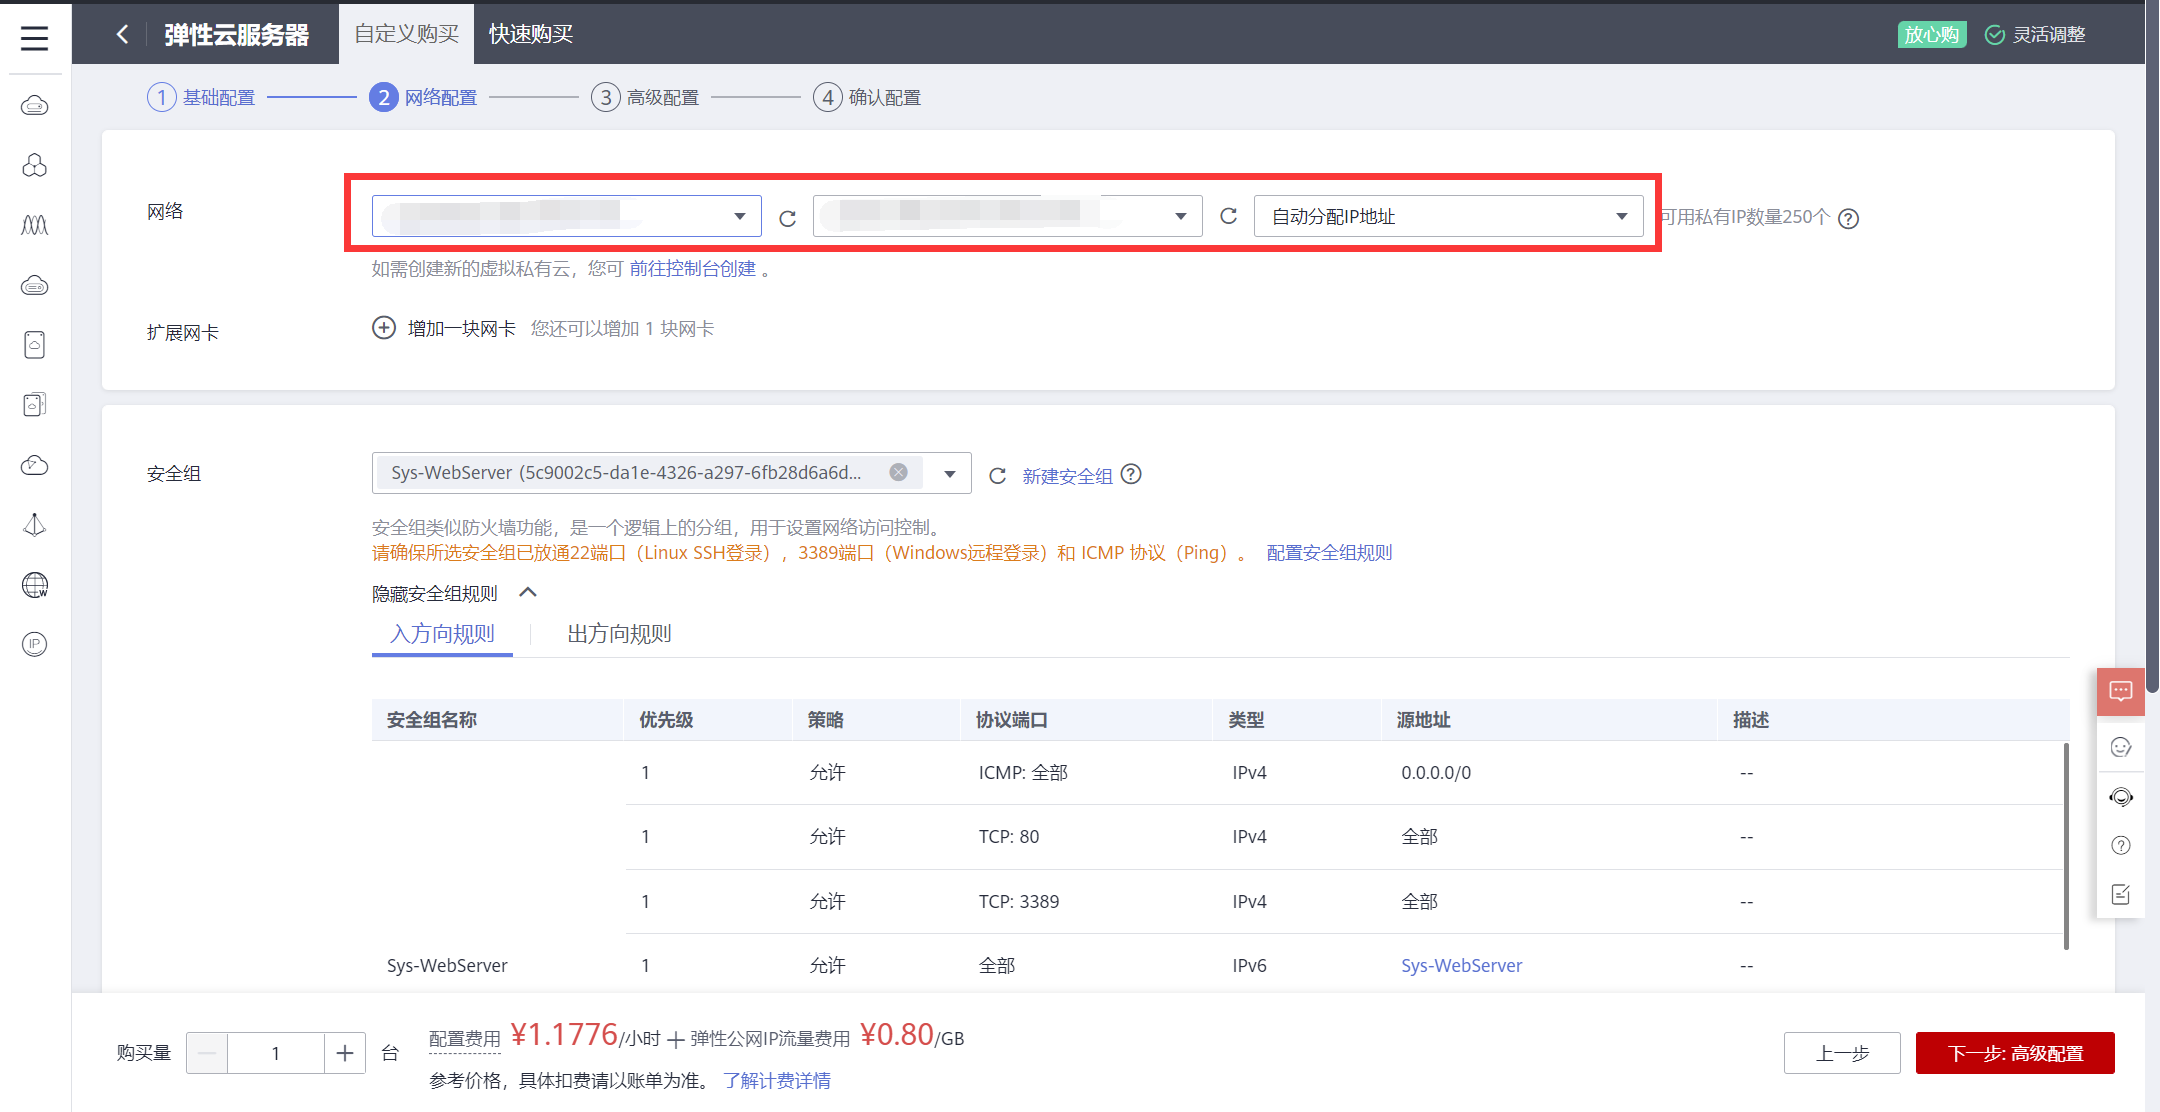
Ascend in Huawei Cloud
refer to https://support.huaweicloud.com/ecs/index.html
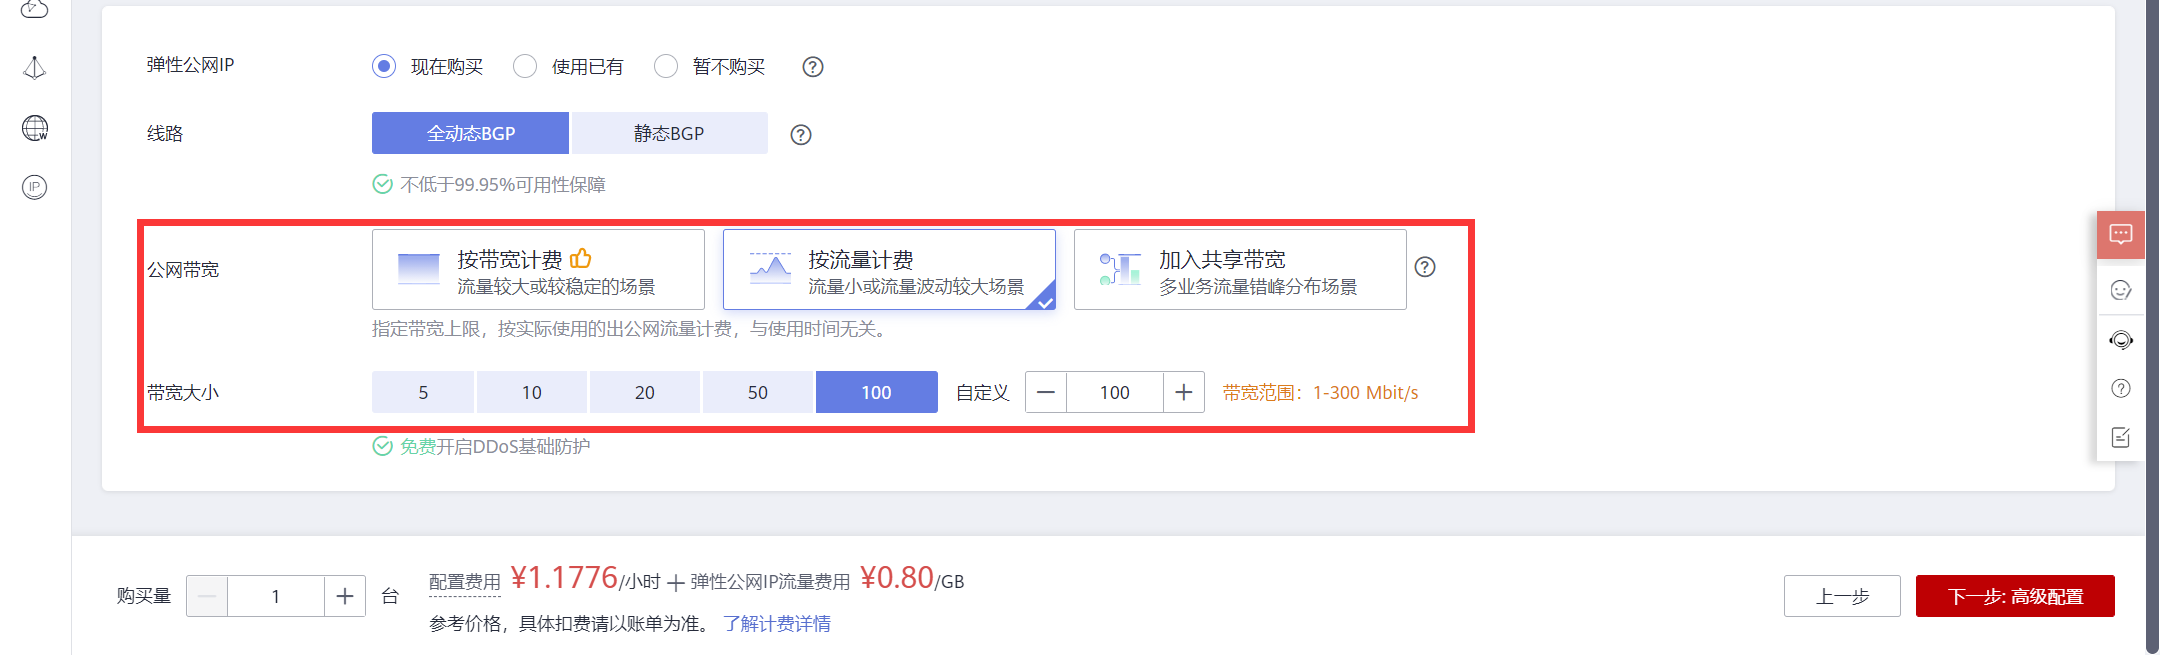
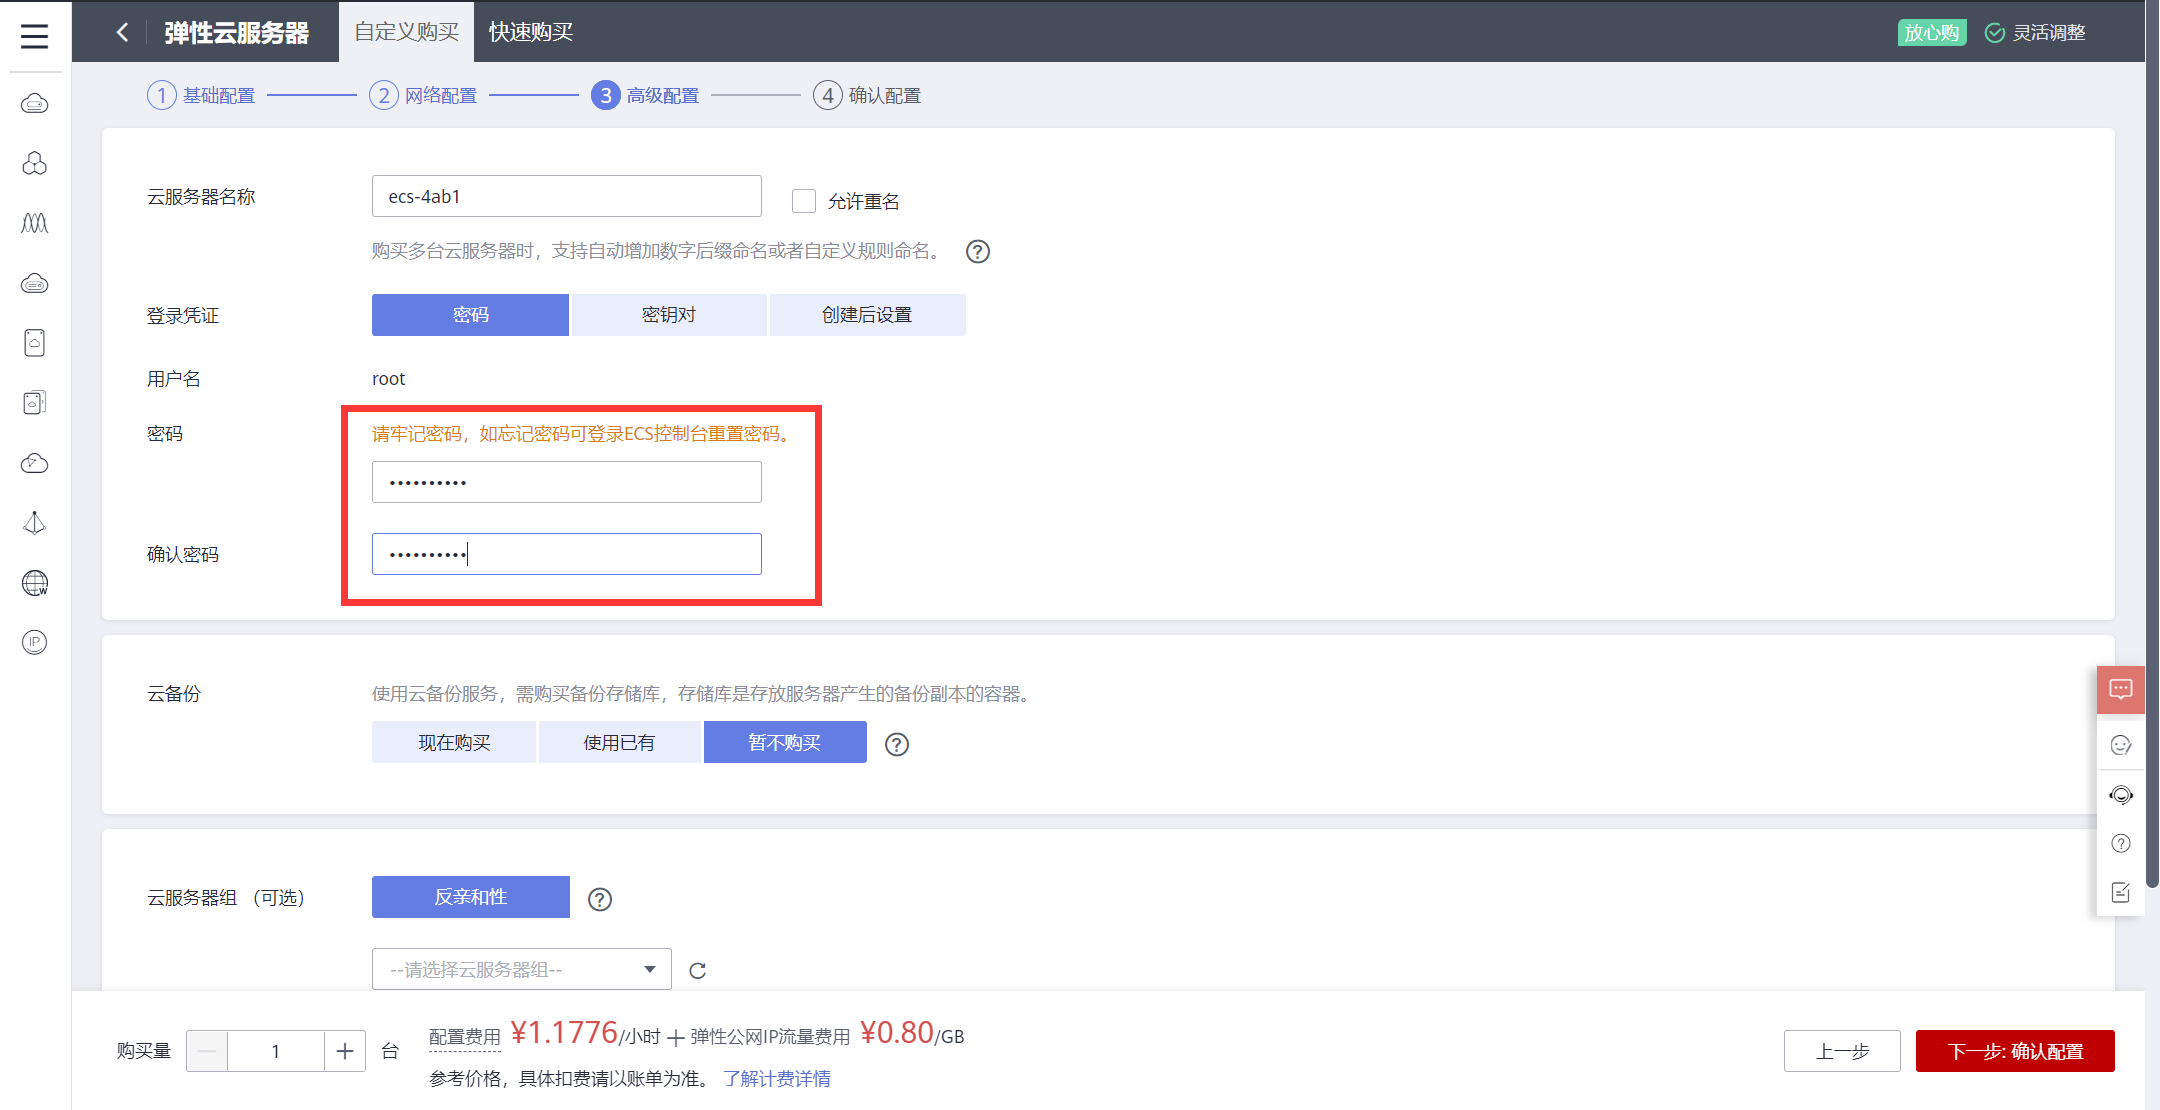

remote login with a software in PC, like Termius in Mac OS, MobaXterm in Windows,
articles about MobaXterm: MobaXterm技巧,
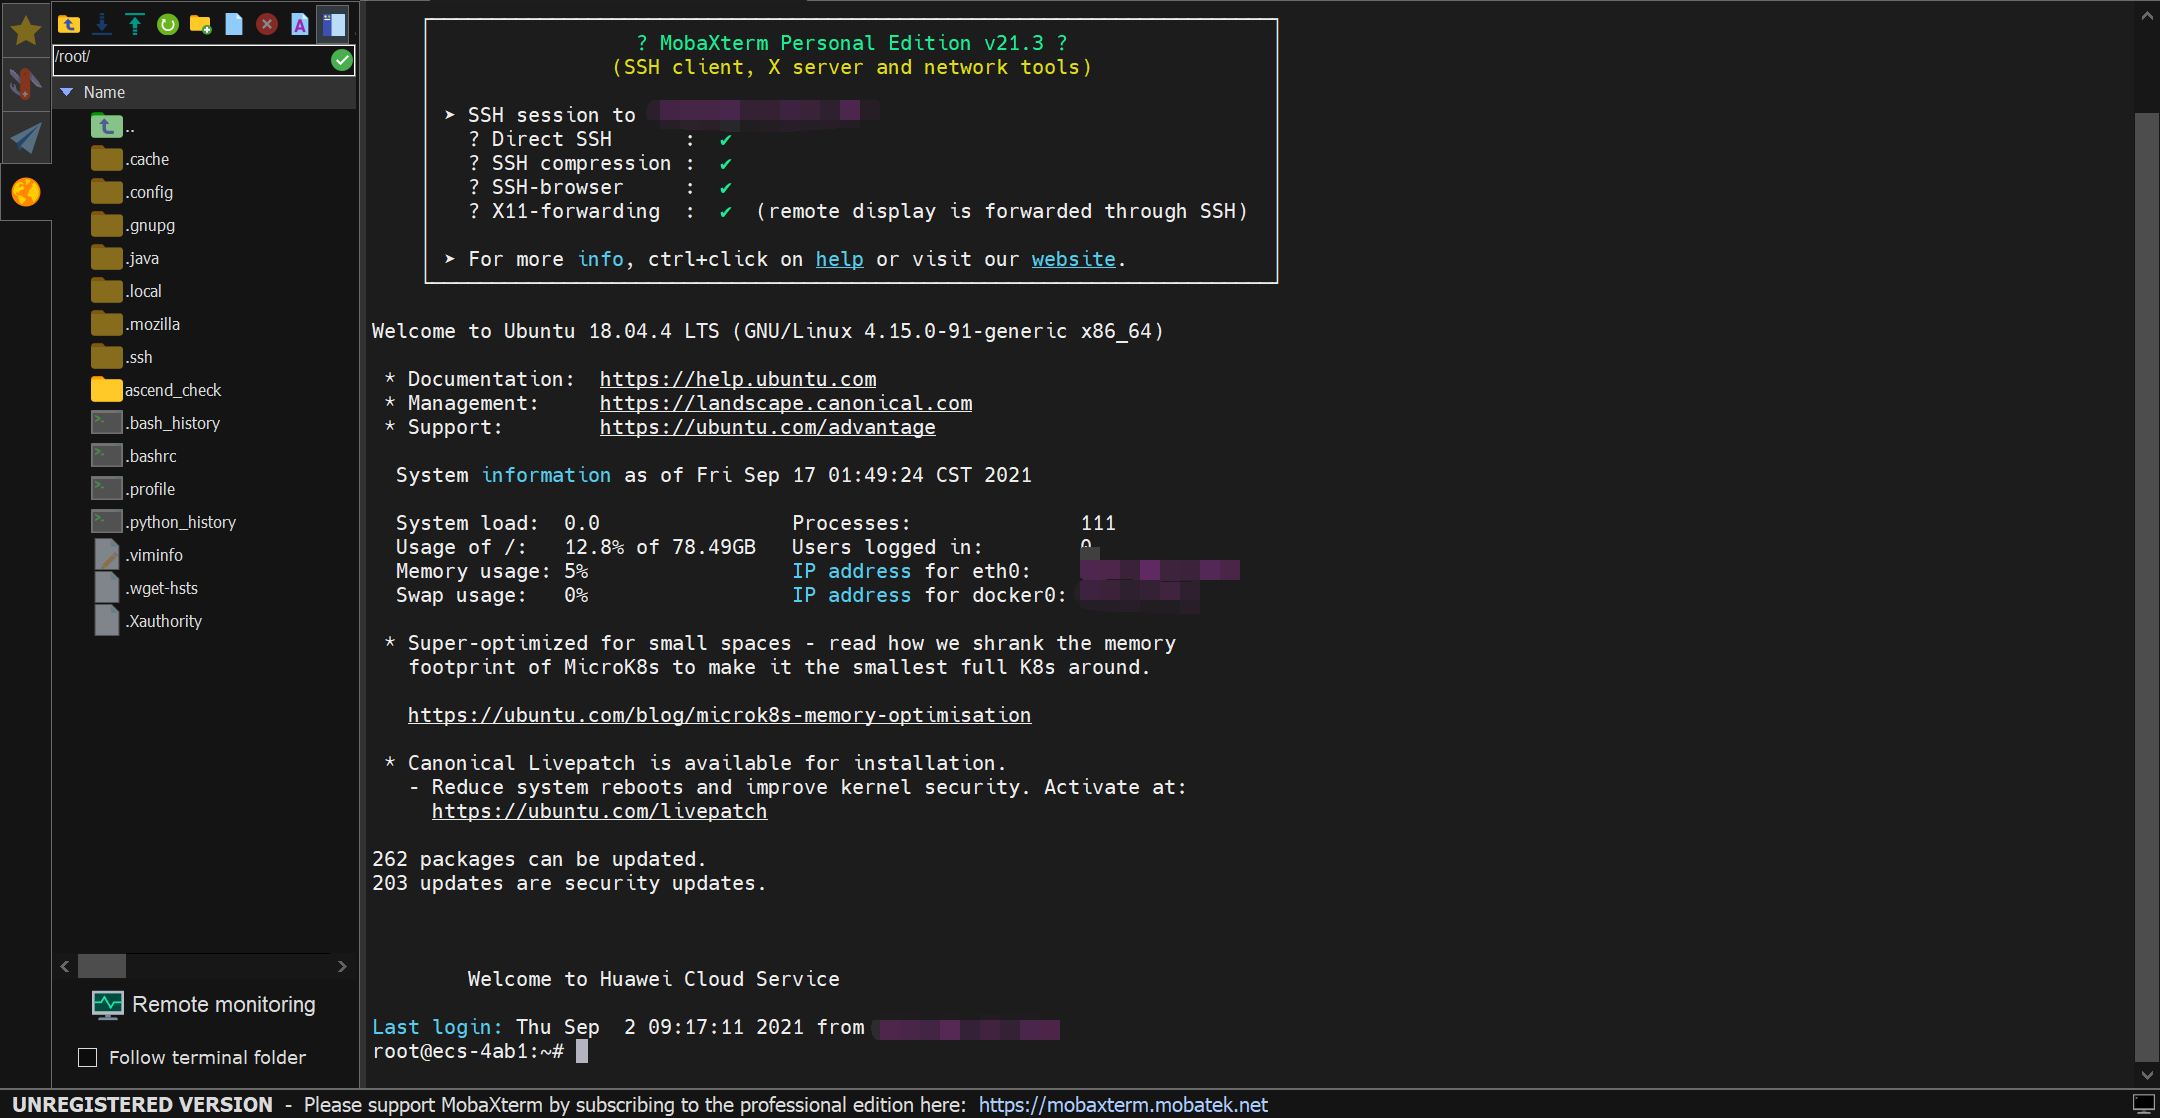
Note that it is supported to drag and drop files from PC.
MindSpore installation
Make sure dependency installed first, refer to MindSpore安装指南, ML environment.
Taking the installation of MindSpore 1.2 on Ubuntu-x86(GPU CUDA 10.1) for example, only one line refer to MindSpore安装指南:
|
Check your installation:
|
Test 1:
|
Test 2:
|
Test 3:
refer to 体验快速入门,
|
Euler OS
|
Mind Studio
refer to 昇腾CANN训练营-应用营第一讲——开发&运行环境部署 (0:46:36).
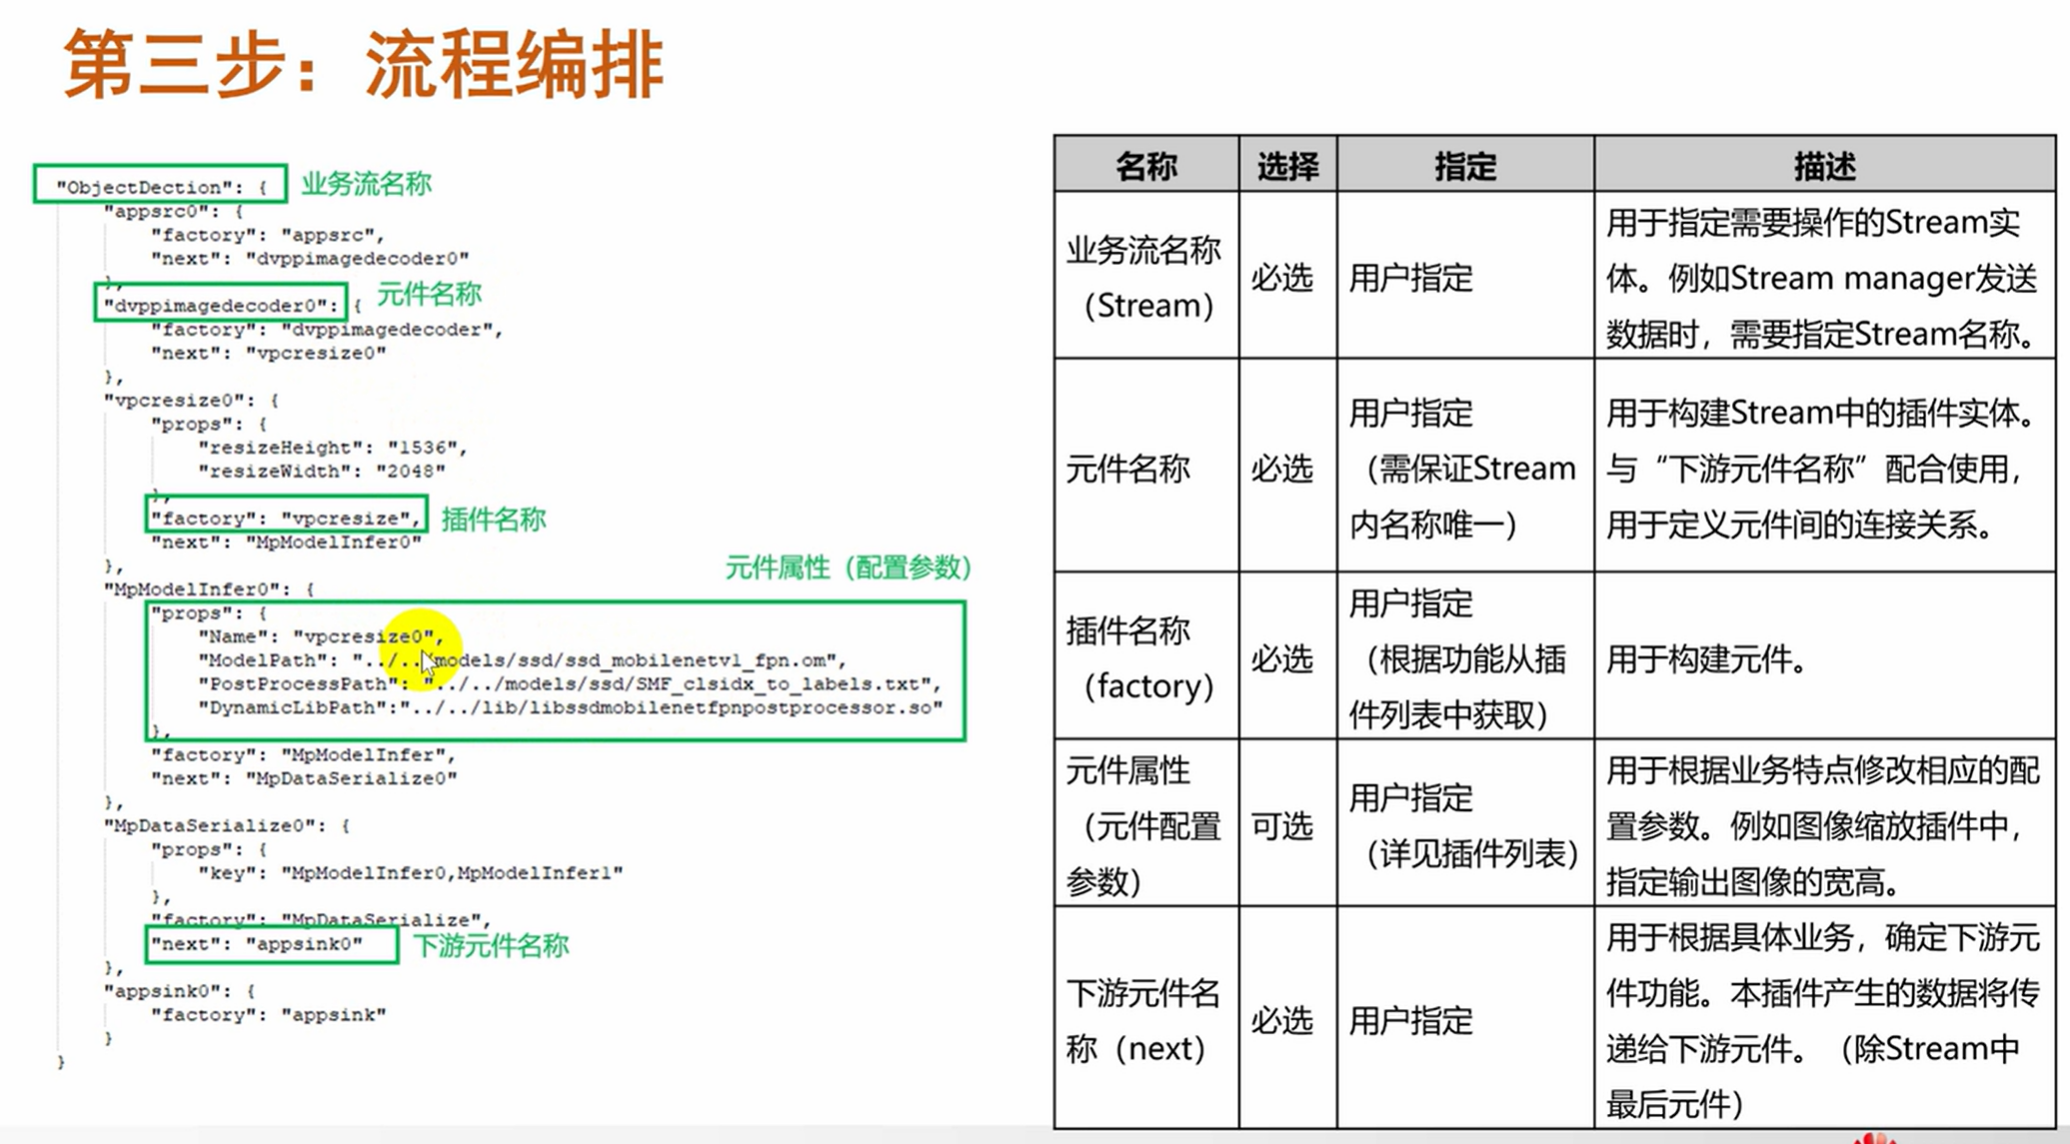
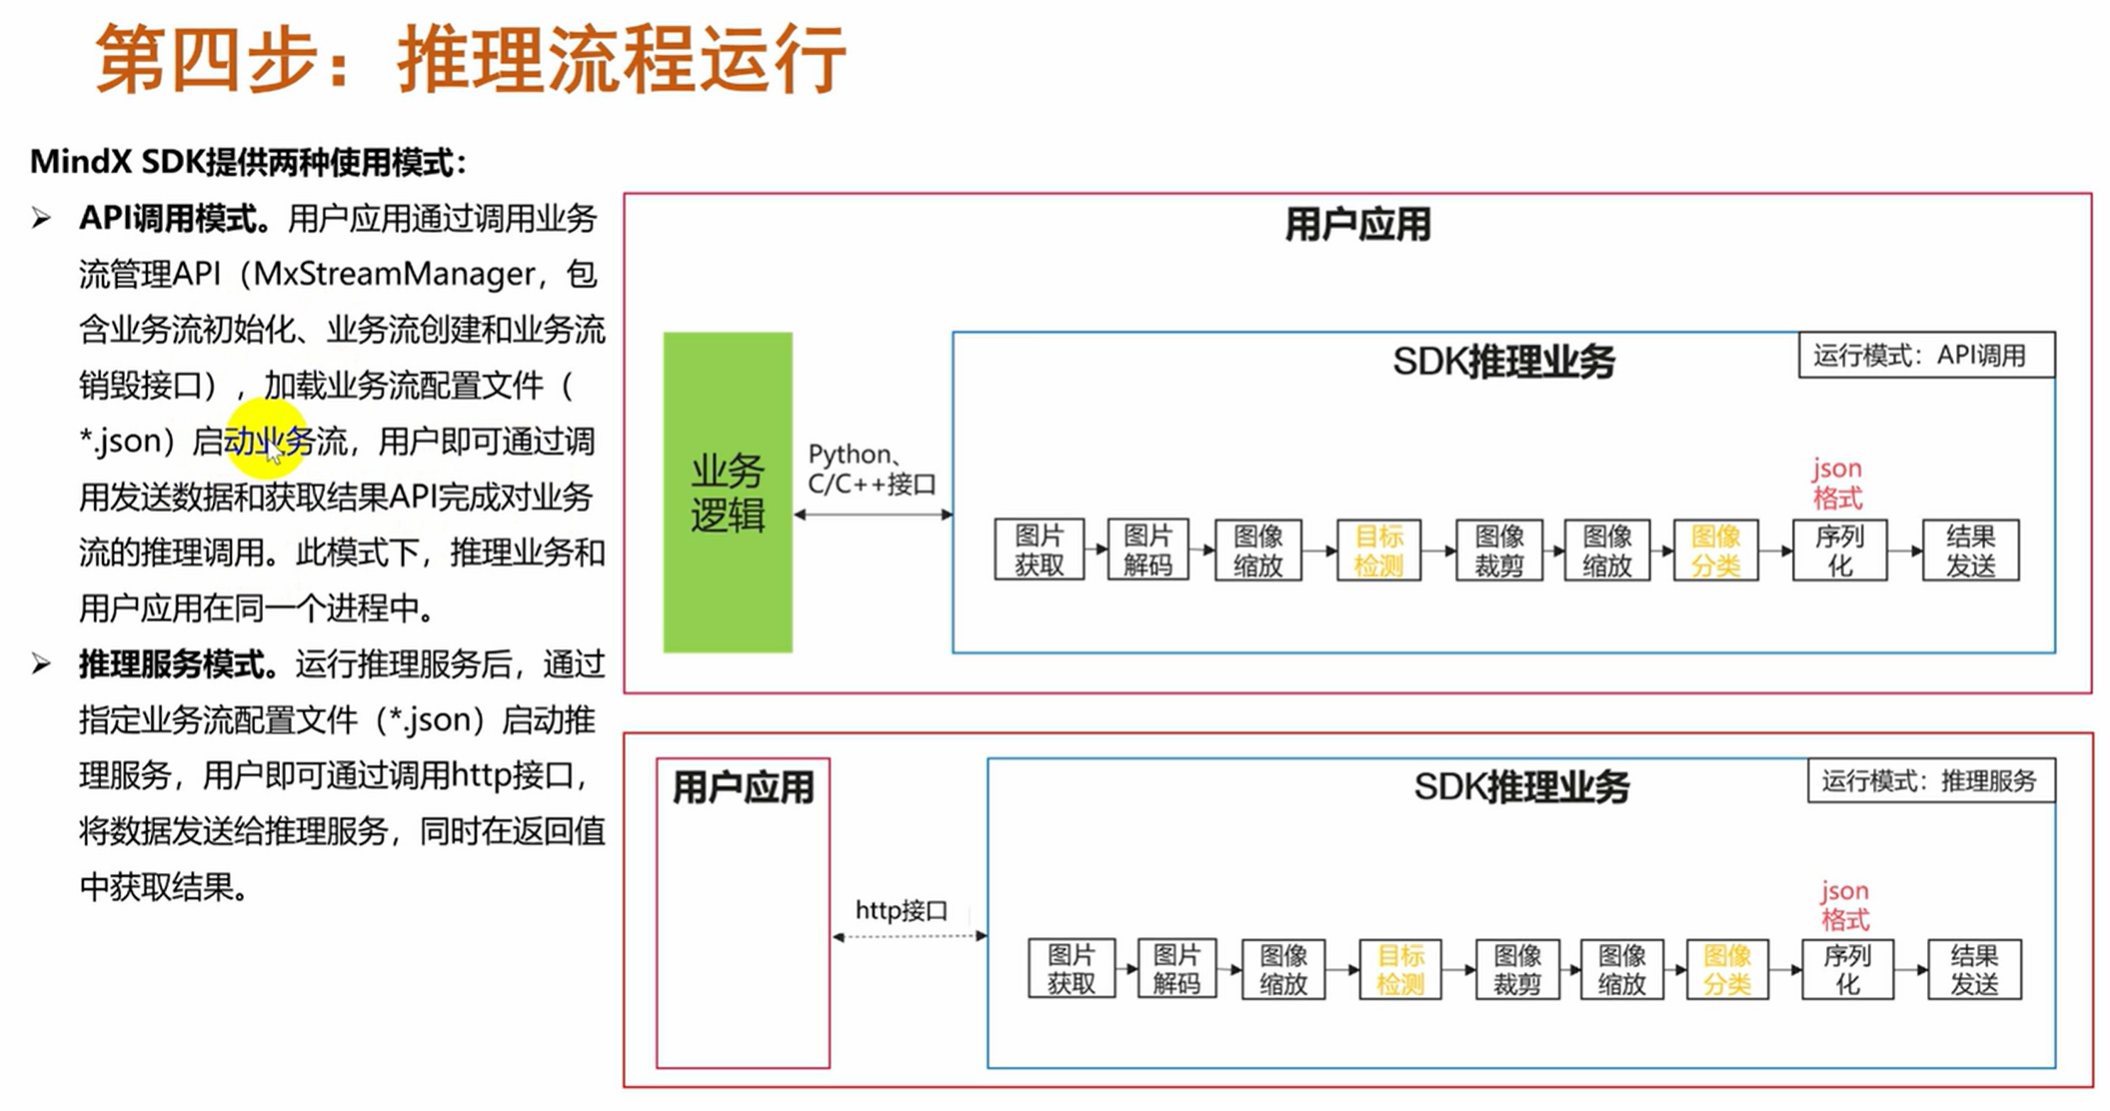
MindX SDK

7个API
